|
Last Modified: 01-30-2024 |
6.11:8.1.0 |
Doc ID: RM100000001E3AY |
|
Model Year Start: 2019 |
Model: RAV4 |
Prod Date Range: [11/2018 - 02/2019] |
|
Title: DOOR LOCK: DOOR CONTROL RECEIVER: REMOVAL; 2019 MY RAV4 RAV4 HV [11/2018 - 02/2019] |
REMOVAL
CAUTION / NOTICE / HINT
The necessary procedures (adjustment, calibration, initialization, or registration) that must be performed after parts are removed, installed, or replaced during the door control receiver or door control and tire pressure monitoring system receiver assembly or electrical key and tire pressure monitoring system receiver assembly removal/installation are shown below.
Necessary Procedure After Parts Removed/Installed/Replaced (for HV Model)
|
Replaced Part or Performed Procedure
|
Necessary Procedure
|
Effect/Inoperative Function when Necessary Procedure not Performed
|
Link
|
w/ Tire Pressure Warning System:
-
Tire pressure warning ECU and receiver
|
-
Register transmitter ID
-
Initialize tire pressure warning system
|
-
When DTC detection conditions of "transmitter ID not received" DTC are met, TPWS indicator blinks for 1 minute, and then illuminates
-
Tire pressure warning function
|
for Initialization:
![2019 - 2021 MY RAV4 RAV4 HV [11/2018 - 12/2021]; TIRE PRESSURE MONITORING: TIRE PRESSURE WARNING SYSTEM: INITIALIZATION](/t3Portal/stylegraphics/info.gif)
for Registration:
![2019 MY RAV4 RAV4 HV [11/2018 - 10/2019]; TIRE PRESSURE MONITORING: TIRE PRESSURE WARNING SYSTEM: REGISTRATION](/t3Portal/stylegraphics/info.gif)
|
Necessary Procedure After Parts Removed/Installed/Replaced (for Gasoline Model)
|
Replaced Part or Performed Procedure
|
Necessary Procedure
|
Effect/Inoperative Function when Necessary Procedure not Performed
|
Link
|
w/ Tire Pressure Warning System:
-
Tire pressure warning ECU and receiver
|
-
Register transmitter ID
-
Initialize tire pressure warning system
|
-
When DTC detection conditions of "transmitter ID not received" DTC are met, TPWS indicator blinks for 1 minute, and then illuminates
-
Tire pressure warning function
|
for Initialization:
![2019 - 2021 MY RAV4 RAV4 HV [11/2018 - 12/2021]; TIRE PRESSURE MONITORING: TIRE PRESSURE WARNING SYSTEM: INITIALIZATION](/t3Portal/stylegraphics/info.gif)
for Registration:
![2019 MY RAV4 RAV4 HV [11/2018 - 10/2019]; TIRE PRESSURE MONITORING: TIRE PRESSURE WARNING SYSTEM: REGISTRATION](/t3Portal/stylegraphics/info.gif)
|
|
|
Register a new recognition code
|
Wireless door lock control system (w/o Smart key system)
|
![2019 - 2024 MY RAV4 RAV4 HV [11/2018 - ]; DOOR LOCK: WIRELESS DOOR LOCK CONTROL SYSTEM (w/o Smart Key System): REGISTRATION](/t3Portal/stylegraphics/info.gif)
|
PROCEDURE
1. REMOVE REAR SEAT ASSEMBLY
Click here
![2019 - 2024 MY RAV4 RAV4 HV [11/2018 - ]; SEAT: REAR SEAT ASSEMBLY: REMOVAL](/t3Portal/stylegraphics/info.gif)
2. REMOVE CHILD RESTRAINT SEAT ANCHOR BRACKET SUB-ASSEMBLY RH
HINT:
Use the same procedure described for the LH side.
Click here
![2019 - 2024 MY RAV4 RAV4 HV [11/2018 - ]; SEAT BELT: CHILD RESTRAINT SEAT ANCHOR BRACKET: REMOVAL+](/t3Portal/stylegraphics/info.gif)
3. REMOVE TONNEAU COVER ASSEMBLY (w/ Tonneau Cover)
Click here
![2019 MY RAV4 RAV4 HV [11/2018 - 02/2019]; INTERIOR PANELS / TRIM: ROOF HEADLINING: REMOVAL+](/t3Portal/stylegraphics/info.gif)
4. REMOVE DECK BOARD ASSEMBLY
Click here
![2019 MY RAV4 RAV4 HV [11/2018 - 02/2019]; INTERIOR PANELS / TRIM: ROOF HEADLINING: REMOVAL+](/t3Portal/stylegraphics/info.gif)
5. REMOVE REAR NO. 2 FLOOR BOARD
Click here
![2019 MY RAV4 RAV4 HV [11/2018 - 02/2019]; INTERIOR PANELS / TRIM: ROOF HEADLINING: REMOVAL+](/t3Portal/stylegraphics/info.gif)
6. REMOVE REAR FLOOR FINISH PLATE
Click here
![2019 MY RAV4 RAV4 HV [11/2018 - 02/2019]; INTERIOR PANELS / TRIM: ROOF HEADLINING: REMOVAL+](/t3Portal/stylegraphics/info.gif)
7. REMOVE REAR NO. 1 FLOOR MAT SUPPORT SIDE PLATE
Click here
![2019 MY RAV4 RAV4 HV [11/2018 - 02/2019]; INTERIOR PANELS / TRIM: ROOF HEADLINING: REMOVAL+](/t3Portal/stylegraphics/info.gif)
8. REMOVE REAR DOOR SCUFF PLATE RH (for Gasoline Model)
HINT:
Use the same procedure described for the LH side.
Click here
![2019 MY RAV4 RAV4 HV [11/2018 - 02/2019]; INTERIOR PANELS / TRIM: ROOF HEADLINING: REMOVAL+](/t3Portal/stylegraphics/info.gif)
9. REMOVE REAR DOOR OPENING TRIM WEATHERSTRIP RH
HINT:
-
Pull back the rear seat side garnish RH so that the rear door opening trim weatherstrip RH can be removed.
-
Use the same procedure described for the LH side.
Click here
![2019 - 2024 MY RAV4 RAV4 HV [11/2018 - ]; DOOR / HATCH: REAR DOOR OPENING TRIM WEATHERSTRIP: REMOVAL+](/t3Portal/stylegraphics/info.gif)
10. REMOVE REAR SEAT SIDE GARNISH RH
HINT:
Use the same procedure described for the LH side.
Click here
![2019 MY RAV4 RAV4 HV [11/2018 - 02/2019]; INTERIOR PANELS / TRIM: ROOF HEADLINING: REMOVAL+](/t3Portal/stylegraphics/info.gif)
11. REMOVE TETHER ANCHOR BRACKET SET
Click here
![2019 MY RAV4 RAV4 HV [11/2018 - 02/2019]; INTERIOR PANELS / TRIM: ROOF HEADLINING: REMOVAL+](/t3Portal/stylegraphics/info.gif)
12. REMOVE LUGGAGE HOLD BELT STRIKER ASSEMBLY
Click here
![2019 MY RAV4 RAV4 HV [11/2018 - 02/2019]; INTERIOR PANELS / TRIM: ROOF HEADLINING: REMOVAL+](/t3Portal/stylegraphics/info.gif)
13. REMOVE DECK TRIM SIDE PANEL ASSEMBLY LH
Click here
![2019 MY RAV4 RAV4 HV [11/2018 - 02/2019]; INTERIOR PANELS / TRIM: ROOF HEADLINING: REMOVAL+](/t3Portal/stylegraphics/info.gif)
14. REMOVE INNER ROOF SIDE GARNISH ASSEMBLY RH
HINT:
Use the same procedure described for the LH side.
Click here
![2019 MY RAV4 RAV4 HV [11/2018 - 02/2019]; INTERIOR PANELS / TRIM: ROOF HEADLINING: REMOVAL+](/t3Portal/stylegraphics/info.gif)
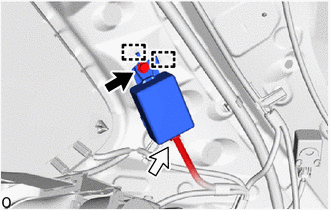
15. REMOVE DOOR CONTROL RECEIVER (w/o Tire Pressure Warning System, w/ Smart Key System)
(a) Remove the bolt.


|
Bolt
|

|
Connector
|
(b) Detach the guide and remove the door control receiver.
(c) Disconnect the connector.
NOTICE:
-
Do not subject the door control receiver to strong impacts or force, and do not drop it.
-
Do not reuse the door control receiver that has been dropped.
16. REMOVE DOOR CONTROL RECEIVER (w/o Tire Pressure Warning System, w/o Smart Key System)
HINT:
Use the same procedure described for the door control receiver.
17. REMOVE DOOR CONTROL AND TIRE PRESSURE MONITORING SYSTEM RECEIVER ASSEMBLY (w/ Tire Pressure Warning System, w/o Smart Key System)
HINT:
Use the same procedure described for the door control receiver.
18. REMOVE ELECTRICAL KEY AND TIRE PRESSURE MONITORING SYSTEM RECEIVER ASSEMBLY (w/ Tire Pressure Warning System, w/ Smart Key System)
HINT:
Use the same procedure described for the door control receiver.
|