| 
                           Last Modified: 05-08-2025 | 
                        6.11:8.1.0  | 
                        
                           Doc ID: RM100000001E3BQ | 
                      
                     
                        | 
                           Model Year Start: 2019 | 
                        
                           Model: RAV4 | 
                        
                           Prod Date Range: [11/2018 - 10/2023] | 
                      
                     
                        | 
                           Title: DOOR / HATCH: BACK DOOR: REASSEMBLY; 2019 - 2023 MY RAV4 RAV4 HV [11/2018 - 10/2023] | 
                      
                   
                  REASSEMBLY
                   
                  PROCEDURE
                   
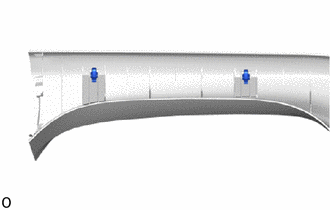
                  1. INSTALL BACK DOOR LOWER STOPPER CUSHION 


                           | 
                               (a) Attach the claw and install a new back door lower stopper cushion. 
                              HINT: 
                              Use the same procedure for the RH and LH sides. 
                            | 
                           
                              
                            | 


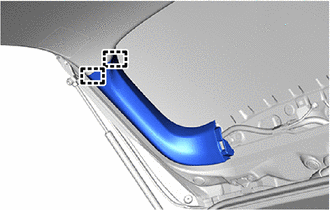
                  2. INSTALL BACK DOOR DUST PROOF SEAL 


                           | 
                               (a) Attach the claw and guide to install the back door dust proof seal. 
                              HINT: 
                              Use the same procedure for the RH and LH sides. 
                            | 
                           
                              
                            | 


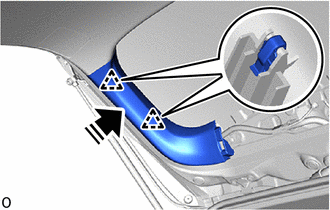
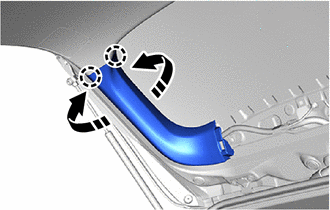
                  3. INSTALL BACK DOOR DUST PROOF SEAL 


                           | 
                               (a) Attach the claw and install the back door dust proof seal. 
                            | 
                           
                              
                            | 


                  4. INSTALL BACK DOOR STAY STOPPER (w/ Power Back Door) 
                  Click here


                  5. INSTALL BACK DOOR LOWER DAMPER STAY BRACKET LH (w/ Power Back Door) 
                  Click here


                  6. INSTALL BACK DOOR LOWER DAMPER STAY BRACKET RH (w/ Power Back Door) 
                  HINT: 
                  Use the same procedure described for the LH side. 
                   
                  7. INSTALL BACK DOOR UPPER DAMPER STAY BRACKET LH (w/ Power Back Door) 
                  Click here


                  8. INSTALL BACK DOOR UPPER DAMPER STAY BRACKET RH (w/ Power Back Door) 
                  HINT: 
                  Use the same procedure described for the LH side. 
                   
                  9. INSTALL POWER BACK DOOR UNIT ASSEMBLY LH (w/ Power Back Door) 
                  Click here


                  10. INSTALL POWER BACK DOOR UNIT ASSEMBLY RH (w/ Power Back Door) 
                  HINT: 
                  Use the same procedure described for the LH side. 
                   
                  11. INSTALL BACK DOOR STAY STOPPER (w/o Power Back Door) 
                  Click here


                  12. INSTALL BACK DOOR LOWER DAMPER STAY BRACKET LH (w/o Power Back Door) 
                  Click here


                  13. INSTALL BACK DOOR LOWER DAMPER STAY BRACKET RH (w/o Power Back Door) 
                  HINT: 
                  Use the same procedure described for the LH side. 
                   
                  14. INSTALL BACK DOOR UPPER DAMPER STAY BRACKET LH (w/o Power Back Door) 
                  Click here


                  15. INSTALL BACK DOOR UPPER DAMPER STAY BRACKET RH (w/o Power Back Door) 
                  HINT: 
                  Use the same procedure described for the LH side. 
                   
                  16. INSTALL BACK DOOR STAY ASSEMBLY LH (w/o Power Back Door) 
                  Click here


                  17. INSTALL BACK DOOR STAY ASSEMBLY RH (w/o Power Back Door) 
                  HINT: 
                  Use the same procedure described for the LH side. 
                   
                  18. INSTALL BACK DOOR LOWER OUTSIDE GARNISH SUB-ASSEMBLY 
                  Click here


                  19. INSTALL REAR LIGHT ASSEMBLY LH 
                  Click here


                  20. INSTALL REAR LIGHT ASSEMBLY RH 
                  HINT: 
                  Use the same procedure described for the LH side. 
                   
                  21. INSTALL TELEVISION CAMERA ASSEMBLY (w/ Rear View Monitor System) 
                  Click here


                  22. INSTALL BACK DOOR OUTSIDE GARNISH PROTECTOR (w/o Rear View Monitor System) 
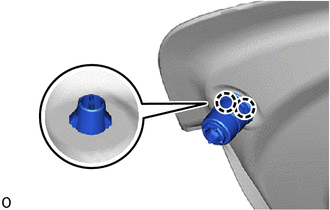
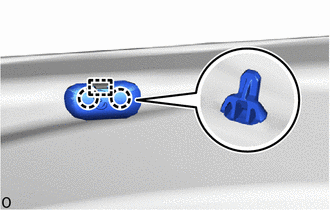
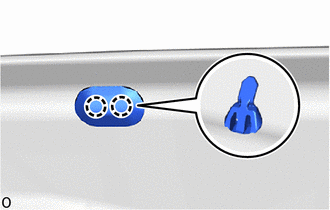
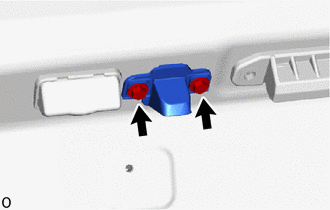
                  (a) Attach the claw to install the 2 screw grommets. 


                            | 
                           
                               Install in this Direction 
                            | 


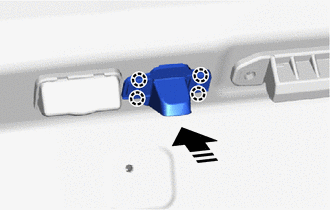
                  (b) Attach the claw and install the back door outside garnish protector. 


                            | 
                           
                               Install in this Direction 
                            | 


                           | 
                               (c) Install the 2 screws. 
                            | 
                           
                              
                            | 


                  23. INSTALL BACK DOOR OPENER SWITCH ASSEMBLY 
                  Click here


                  24. INSTALL LICENSE PLATE LIGHT ASSEMBLY LH 
                  Click here


                  25. INSTALL LICENSE PLATE LIGHT ASSEMBLY RH 
                  HINT: 
                  Use the same procedure described for the LH side. 
                   
                  26. INSTALL BACK DOOR OUTSIDE GARNISH SUB-ASSEMBLY 
                  Click here


                  27. INSTALL BACK DOOR WEIGHT 
                  
                  (b) Install the back door weight with the 3 bolts. 
                  Torque:  
                  8.0 N·m {82 kgf·cm, 71 in·lbf} 
                   
                  28. INSTALL MULTIPLEX NETWORK DOOR ECU (w/ Power Back Door) 
                  Click here


                  29. INSTALL BACK DOOR LOCK ASSEMBLY (w/o Power Back Door) 
                  Click here


                  30. INSTALL BACK DOOR LOCK ASSEMBLY (w/ Power Back Door) 
                  Click here


                  31. INSTALL REAR WIPER MOTOR GROMMET 
                  Click here


                  32. INSTALL REAR WIPER MOTOR ASSEMBLY 
                  Click here


                  33. INSTALL REAR WIPER ARM AND BLADE ASSEMBLY 
                  Click here


                  34. INSTALL REAR WIPER ARM HEAD CAP 
                  Click here


                  35. INSTALL REAR WASHER NOZZLE 


                           | 
                               (a) Attach the claw and install the rear washer nozzle. 
                            | 
                           
                              
                            | 


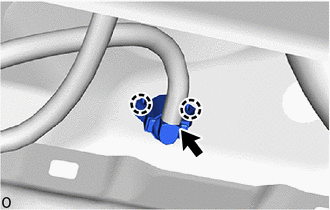
                  (b) Connect the rear washer hose to the rear washer nozzle. 
                   
                  36. INSTALL INNER MIRROR CAMERA ASSEMBLY (w/ Digital inner mirror) 
                  Click here


                  37. INSTALL REAR SPOILER SUB-ASSEMBLY 
                  Click here


                  38. INSTALL POWER BACK DOOR SENSOR ASSEMBLY LH (w/ Power Back Door) 
                  Click here


                  39. INSTALL POWER BACK DOOR SENSOR ASSEMBLY RH (w/ Power Back Door) 
                  HINT: 
                  Use the same procedure described for the LH side. 
                   
                  40. INSTALL NO. 1 POWER BACK DOOR CONTROL SWITCH (w/ Power Back Door) 
                  Click here


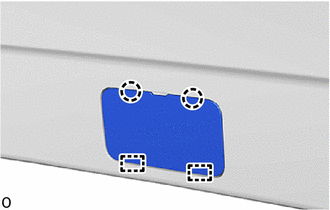
                  41. INSTALL BACK DOOR NO. 2 SERVICE HOLE COVER 


                           | 
                               (a) Attach the guide and claw to install the back door No. 2 service hole cover. 
                            | 
                           
                              
                            | 


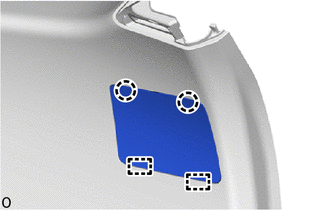
                  42. INSTALL BACK DOOR SERVICE HOLE COVER LH 


                           | 
                               (a) Attach the guide and claw to install the back door service hole cover LH. 
                            | 
                           
                              
                            | 


                  43. INSTALL BACK DOOR SERVICE HOLE COVER RH 
                  HINT: 
                  Use the same procedure described for the LH side. 
                   
                  44. INSTALL BACK DOOR ASSIST GRIP LH 


                           | 
                               (a) Attach the guide and claw to install the back door assist grip LH. 
                            | 
                           
                              
                            | 


                  45. INSTALL BACK DOOR ASSIST GRIP RH 
                  HINT: 
                  Use the same procedure described for the LH side. 
                   
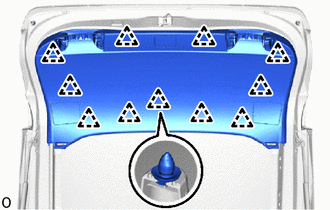
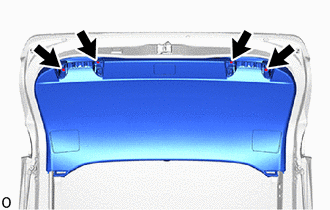
                  46. INSTALL BACK DOOR TRIM BOARD ASSEMBLY 


                           | 
                               (a) Attach the clip and install the back door trim board assembly. 
                            | 
                           
                              
                            | 


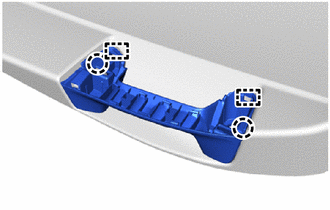
                  47. INSTALL BACK DOOR GRIP BASE 
                  (a) Attach the claw and clip to install the back door grip base as shown in the illustration. 


                            | 
                           
                               Install in this Direction 
                            | 


                  48. INSTALL BACK DOOR GRIP 
                  HINT: 
                  Use the same procedure described for the back door grip base. 
                   
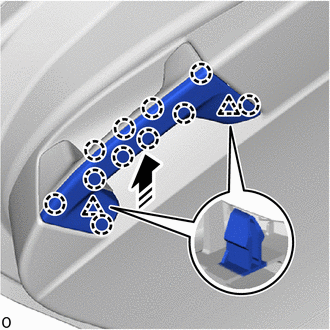
                  49. INSTALL BACK DOOR SIDE GARNISH LH 


                           | 
                               (a) Install 2 new clips to the back door side garnish LH. 
                              NOTICE: 
                              If the back door side garnish LH has been removed, replace the clip with a new one. 
                            | 
                           
                              
                            | 


                            | 
                           
                               Install in this Direction 
                            | 


                  (c) Attach the clip and install the back door side garnish LH as shown in the illustration. 


                            | 
                           
                               Install in this Direction 
                            | 


                  (d) Attach the claw as shown in the illustration. 
                   
                  50. INSTALL BACK DOOR SIDE GARNISH RH 
                  HINT: 
                  Use the same procedure described for the LH side. 
                   
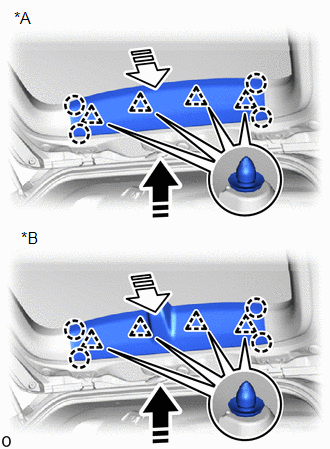
                  51. INSTALL BACK DOOR CENTER GARNISH 
                  (a) Attach the claw and clip to install the back door center garnish as shown in the illustration. 


                           | 
                               *A 
                            | 
                           
                               w/o Digital Inner Mirror 
                            | 
                         
                        
                           | 
                               *B 
                            | 
                           
                               w/ Digital Inner Mirror 
                            | 


                            | 
                           
                               Install in this Direction (1) 
                            | 


                            | 
                           
                               Install in this Direction (2) 
                            | 


                  52.   INITIALIZE POWER BACK DOOR SYSTEM (w/ Power Back Door) 
                  (a) for Gasoline Model: 
                  Click here


                  (b) for HV Model: 
                  Click here


                  53. INSPECT POWER BACK DOOR SYSTEM (w/ Power Back Door) 
                  (a) for Gasoline Model: 
                  Click here


                  (b) for HV Model: 
                  Click here


                  54. ADJUST TELEVISION CAMERA ASSEMBLY 
                  (a) w/ Parking Assist Monitor System: 
                  Click here


                  (b) w/ Panoramic View Monitor System: 
                  (1) for HV Model: 
                  Click here


                  (2) for Gasoline Model: 
                  Click here


                |