| Last Modified: 09-02-2025 | 6.11:8.1.0 | Doc ID: RM100000001E3DA |
| Model Year Start: 2019 | Model: RAV4 | Prod Date Range: [11/2018 - ] |
| Title: WIPER / WASHER: REAR WIPER MOTOR: INSTALLATION; 2019 - 2025 MY RAV4 RAV4 HV [11/2018 - ] | ||
INSTALLATION
PROCEDURE
PROCEDURE
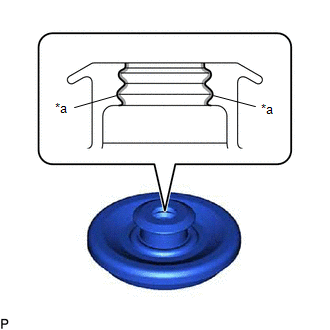
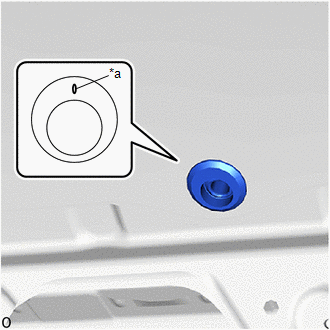
1. INSTALL REAR WIPER MOTOR GROMMET
|
(a) Apply MP grease to the entire surface of the rear wiper motor grommet lip. HINT: Make sure that the hole does not get clogged with grease and the grooves on the lip are filled with grease. |
|
|
(b) Install the rear wiper motor grommet. HINT: Install the rear wiper motor grommet with its matchmark facing up. |
|
2. INSTALL REAR WIPER MOTOR ASSEMBLY
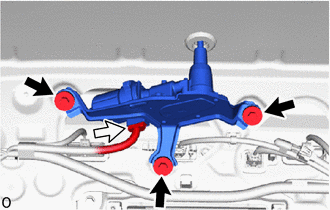
(a) for Type A and Type C:

|
Bolt |

|
Connector |
(1) Install the rear wiper motor assembly with the 3 bolts.
Torque:
5.5 N·m {56 kgf·cm, 49 in·lbf}
(2) Connect the connector.
NOTICE:
Do not reuse the rear wiper motor assembly which has been subjected to an impact or dropped.
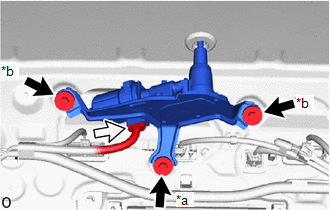
(b) for Type B:
|
*a |
Bolt (A) |
|
*b |
Bolt (B) |

|
Bolt |

|
Connector |
(1) Install the rear wiper motor assembly with the 2 bolts (B).
Torque:
5.5 N·m {56 kgf·cm, 49 in·lbf}
(2) Install the bolt (A).
Torque:
5.5 N·m {56 kgf·cm, 49 in·lbf}
(3) Connect the connector.
NOTICE:
Do not reuse the rear wiper motor assembly which has been subjected to an impact or dropped.
|
*a |
Bolt (A) |
|
*b |
Bolt (B) |

|
Bolt |

|
Connector |
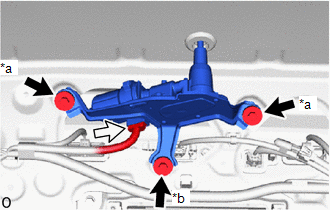
(c) for Type D:
(1) Install the rear wiper motor assembly with the bolt (B).
Torque:
5.5 N·m {56 kgf·cm, 49 in·lbf}
(2) Install the 2 bolts (A).
Torque:
5.5 N·m {56 kgf·cm, 49 in·lbf}
(3) Connect the connector.
NOTICE:
Do not reuse the rear wiper motor assembly which has been subjected to an impact or dropped.
3. INSTALL REAR WIPER ARM AND BLADE ASSEMBLY
|
(a) When reusing the rear wiper arm and blade assembly: (1) Clean the rear wiper arm serrations. NOTICE: Do not grind the rear wiper arm serrations. |
|
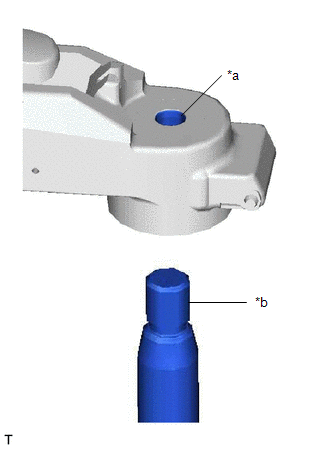
(b) When reusing the rear wiper motor assembly:
(1) Using a wire brush, clean the rear wiper motor assembly pivot serrations.
NOTICE:
Do not grind the rear wiper motor assembly pivot serrations.
(c) Turn the ignition switch to ON.
(d) Operate the rear wiper motor assembly and stop at the automatic stop (park) position.
(e) Turn the ignition switch off.
|
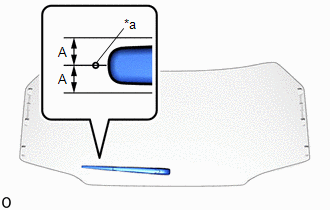
(f) Align the ceramic notch of the back door glass sub-assembly with the edge of the rear wiper arm and blade assembly to install the rear wiper arm and blade assembly with the nut. Torque: 5.5 N·m {56 kgf·cm, 49 in·lbf} Standard:
HINT: Hold the rear wiper arm by hand while tightening the nut. |
|
(g) Turn the ignition switch to ON.
(h) Operate the rear wiper while spraying washer fluid onto the back door glass. Make sure that the rear wiper functions properly and the wiper does not come into contact with the vehicle body.
(i) Turn the ignition switch off.
(j) Raise the rear wiper arm 2 times and check that the tip of the rear wiper blade is within the range shown in the illustration.
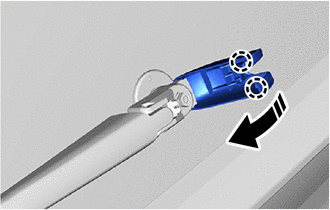
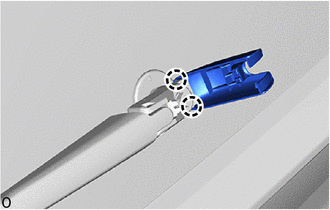
4. INSTALL REAR WIPER ARM HEAD CAP
|
(a) Attach the claw to the rear wiper arm and blade assembly. |
|
(b) Attach the claw and install the rear wiper arm head cap as shown in the illustration.

|
Install in this Direction |
5. INSTALL BACK DOOR TRIM BOARD ASSEMBLY
6. INSTALL BACK DOOR GRIP BASE
7. INSTALL BACK DOOR GRIP
HINT:
Use the same procedure described for the back door grip base.
8. INSTALL BACK DOOR SIDE GARNISH LH
9. INSTALL BACK DOOR SIDE GARNISH RH
HINT:
Use the same procedure described for the LH side.
10. INSTALL BACK DOOR CENTER GARNISH
|
|
|
![2019 - 2023 MY RAV4 RAV4 HV [11/2018 - 10/2023]; DOOR / HATCH: BACK DOOR: REASSEMBLY+](/t3Portal/stylegraphics/info.gif)