| Last Modified: 01-30-2024 | 6.11:8.1.0 | Doc ID: RM100000001ECEK |
| Model Year Start: 2019 | Model: RAV4 | Prod Date Range: [11/2018 - ] |
| Title: REAR SUSPENSION: REAR STABILIZER BAR: INSTALLATION; 2019 - 2024 MY RAV4 RAV4 HV [11/2018 - ] | ||
INSTALLATION
PROCEDURE
1. INSTALL REAR STABILIZER BUSHING
|
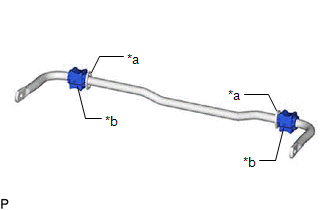
(a) Install the 2 rear stabilizer bushings to the outside of the stoppers on the rear stabilizer bar. NOTICE: Be sure to install the rear stabilizer bushings so that each cutout faces the front of the vehicle. HINT: The cutout of the rear stabilizer bushing can be positioned either up or down. |
|
2. INSTALL REAR NO. 1 STABILIZER BAR BRACKET LH
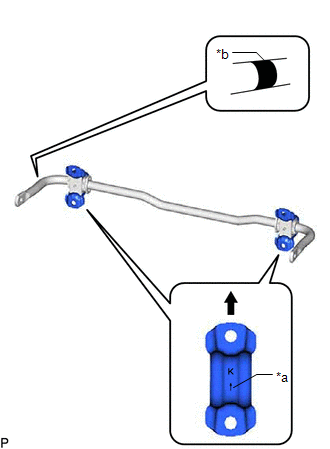
(a) Install the rear No. 1 stabilizer bar bracket LH to the rear stabilizer bushing.
|
*a |
Arrow Mark |
|
*b |
Identification Mark |

|
Upper of the Vehicle |
NOTICE:
- Ensure that the identification mark faces the right side of the vehicle.
- Be sure to install the rear No. 1 stabilizer bar bracket LH so that each arrow mark faces the upper of the vehicle.
3. INSTALL REAR NO. 1 STABILIZER BAR BRACKET RH
HINT:
Perform the same procedure as for the LH side.
4. INSTALL REAR LOWER STABILIZER BRACKET
|
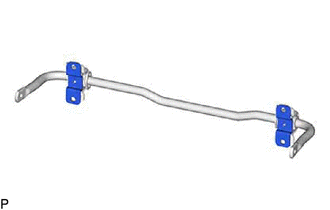
(a) Install the 2 rear lower stabilizer brackets to the rear stabilizer bushing. |
|
5. INSTALL REAR STABILIZER BAR
|
(a) Install the rear stabilizer bar, rear No. 1 stabilizer bar bracket LH, rear No. 1 stabilizer bar bracket RH, rear No. 2 stabilizer bar bracket LH, rear No. 2 stabilizer bar bracket RH and 2 rear stabilizer bushings to the rear suspension member sub-assembly with the 4 bolts. Torque: 78 N·m {795 kgf·cm, 58 ft·lbf} NOTICE:
|
|
6. STABILIZE SUSPENSION
7. INSTALL REAR STABILIZER LINK ASSEMBLY LH
|
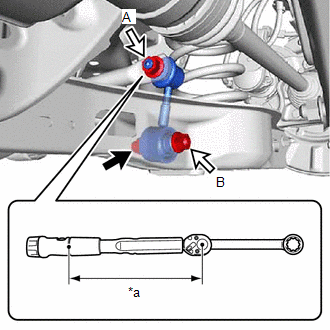
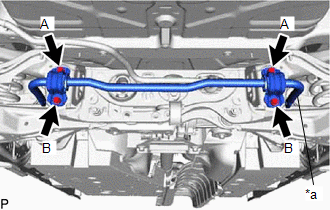
(a) Using a ball joint lock nut wrench, install the rear stabilizer link assembly LH with the nut (A). Torque: 100 N·m {1020 kgf·cm, 74 ft·lbf} HINT:
|
|
(b) Install the rear stabilizer link assembly LH with the bolt and nut (B).
Torque:
81 N·m {826 kgf·cm, 60 ft·lbf}
NOTICE:
Because the nut has its own stopper, do not turn the nut. Tighten the bolt with the nut secured.
8. INSTALL REAR STABILIZER LINK ASSEMBLY RH
HINT:
Perform the same procedure as for the LH side.
9. INSTALL LOWER NO. 2 CONTROL ARM COVER LH (w/ Cover)
10. INSTALL LOWER NO. 2 CONTROL ARM COVER RH (w/ Cover)
HINT:
Perform the same procedure as for the LH side.
11. INSTALL NO. 2 FLOOR UNDER COVER (for Gasoline Model)
w/ Floor Under Cover:
12. INSTALL NO. 1 FLOOR UNDER COVER (for Gasoline Model)
w/ Floor Under Cover:
13. INSTALL FRONT FLOOR COVER LH (for Gasoline Model)
w/ Floor Under Cover:
14. INSTALL FRONT FLOOR COVER RH (for Gasoline Model)
w/ Floor Under Cover:
15. INSTALL NO. 2 ENGINE UNDER COVER ASSEMBLY (for Gasoline Model)
16. INSTALL NO. 1 ENGINE UNDER COVER (for Gasoline Model)
17. INSTALL FRONT FENDER FRONT SPLASH SHIELD LH (for Gasoline Model)
18. INSTALL FRONT FENDER FRONT SPLASH SHIELD RH (for Gasoline Model)
19. INSTALL MAIN MUFFLER HEAT INSULATOR
(a) Install the main muffler heat insulator to the vehicle body with the 4 nuts.
Torque:
4.9 N·m {50 kgf·cm, 43 in·lbf}
20. INSTALL TAIL EXHAUST PIPE ASSEMBLY
21. INSTALL REAR WHEEL
22. INSPECT FOR EXHAUST GAS LEAK
|
|
|
![2019 MY RAV4 RAV4 HV [11/2018 - 02/2019]; REAR SUSPENSION: REAR SHOCK ABSORBER: INSTALLATION+](/t3Portal/stylegraphics/info.gif)
