| 
                           Last Modified: 05-08-2025 | 
                        6.11:8.1.0  | 
                        
                           Doc ID: RM100000001EFBT | 
                      
                     
                        | 
                           Model Year Start: 2019 | 
                        
                           Model: RAV4 | 
                        
                           Prod Date Range: [11/2018 -                    
                                       ] | 
                      
                     
                        | 
                           Title: NETWORKING: NETWORK GATEWAY ECU: INSTALLATION; 2019 - 2025 MY RAV4 RAV4 HV [11/2018 -        ] | 
                      
                   
                  INSTALLATION
                   
                  PROCEDURE
                   
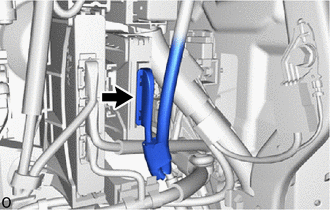
                  1. INSTALL NETWORK GATEWAY ECU 
                  (a) Attach the claw to install the network gateway ECU. 


                            | 
                           
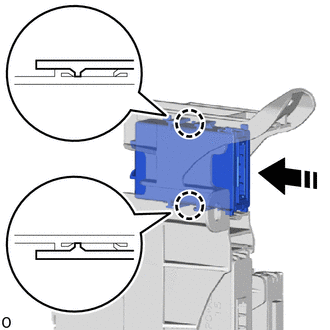
                               Install in this Direction 
                            | 


                  2. INSTALL ECU INTEGRATION BOX RH 
                  (a) Install the ECU integration box RH with the nut and bolt. 
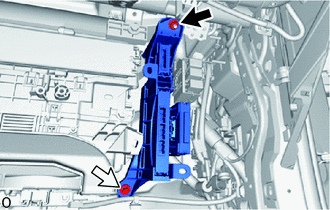


                            | 
                           
                               Nut 
                            | 


                            | 
                           
                               Bolt 
                            | 


                  Torque:  
                  Nut :   
                  5.5 N·m {56 kgf·cm, 49 in·lbf} 
                  Bolt :   
                  5.5 N·m {56 kgf·cm, 49 in·lbf} 


                           | 
                               (b) Attach the 3 wire harness clamps. 
                            | 
                           
                              
                            | 


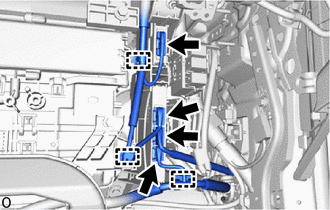
                  (c) Connect the 4 connectors. 


                           | 
                               (d) Attach the claw and relay holder. 
                            | 
                           
                              
                            | 


                           | 
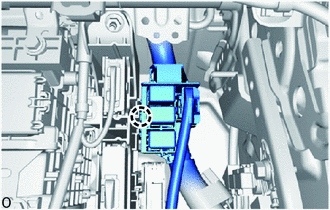
                               (e) w/ Clearance Warning System: 
                              (1) Connect the connector. 
                            | 
                           
                              
                            | 


                  3. INSTALL LOWER NO. 2 INSTRUMENT PANEL FINISH PANEL 
                  Click here


                  4. INSTALL GLOVE COMPARTMENT DOOR ASSEMBLY 
                  Click here


                  5. INSTALL NO. 2 INSTRUMENT PANEL UNDER COVER SUB-ASSEMBLY 
                  Click here


                  6. INSTALL COWL SIDE TRIM BOARD RH 
                  Click here


                  7. INSTALL FRONT DOOR SCUFF PLATE RH 
                  HINT: 
                  Use the same procedure described for the LH side. 
                  Click here


                  8. INSTALL CONSOLE BOX ASSEMBLY 
                  Click here


                  9. CONNECT CABLE TO NEGATIVE AUXILIARY BATTERY TERMINAL 
                  
                  NOTICE: 
                  When disconnecting the cable, some systems need to be initialized after the cable is reconnected. 
                  Click here


                  10. INSTALL BATTERY HOLE COVER (for HV Model) 
                  Click here


                  11. INSTALL REAR NO. 2 FLOOR BOARD (for HV Model) 
                  Click here


                  12. INSTALL DECK BOARD ASSEMBLY (for HV Model) 
                  Click here


                |