| Last Modified: 01-30-2024 | 6.11:8.1.0 | Doc ID: RM100000001EV97 |
| Model Year Start: 2019 | Model: RAV4 | Prod Date Range: [11/2018 - ] |
| Title: A25A-FKS (ENGINE CONTROL): ACTIVE CONTROL ENGINE MOUNT (for Front Side): INSTALLATION; 2019 - 2024 MY RAV4 [11/2018 - ] | ||
INSTALLATION
PROCEDURE
1. INSTALL FRONT ENGINE MOUNTING INSULATOR
(a) Install the stay to the front engine mounting insulator with the nut.
Torque:
6.0 N·m {61 kgf·cm, 53 in·lbf}
(b) Install the front engine mounting insulator to the front frame assembly with the 3 nuts.
Torque:
72 N·m {734 kgf·cm, 53 ft·lbf}
|
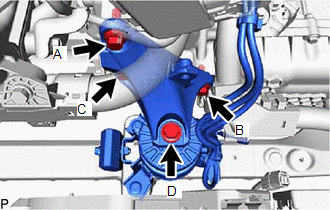
(c) Install the front engine mounting bracket to the transaxle housing with the 3 bolts. Torque: Bolt (A), (B) and (C) : 42 N·m {428 kgf·cm, 31 ft·lbf} NOTICE: Temporarily tighten the bolt (A), and then fully tighten the 3 bolts in the order of (B), (C) and (A). |
|
(d) Install the front engine mounting bracket to the front engine mounting insulator with the bolt (D).
Torque:
Bolt (D) :
72 N·m {734 kgf·cm, 53 ft·lbf}
(e) Connect the vacuum hose to the front engine mounting insulator.
(f) Attach the 2 clamps to connect the vacuum hoses to the front engine mounting insulator.
(g) Install the No. 1 radiator bracket to the front engine mounting bracket with the bolt.
Torque:
19 N·m {194 kgf·cm, 14 ft·lbf}
(h) Attach the 4 clamps to install the radiator hose, vacuum hoses and No. 2 engine wire to the No. 1 radiator bracket.
2. INSTALL NO. 2 ENGINE UNDER COVER ASSEMBLY
3. INSTALL NO. 1 ENGINE UNDER COVER
4. INSTALL VACUUM SWITCHING VALVE (for Active Control Engine Mount System)
5. INSTALL FRONT FENDER SPLASH SHIELD LH
6. INSTALL FRONT FENDER SPLASH SHIELD RH
|
|
|

![2019 - 2020 MY RAV4 [11/2018 - 08/2020]; A25A-FKS (ENGINE MECHANICAL): ENGINE ASSEMBLY: INSTALLATION+](/t3Portal/stylegraphics/info.gif)