- ECU Data Save (ECU being replaced)
- ECU Data Write (When replacing 4WD ECU assembly) (New ECU)
| Last Modified: 09-02-2025 | 6.11:8.1.0 | Doc ID: RM100000001F1DC |
| Model Year Start: 2019 | Model: RAV4 | Prod Date Range: [11/2018 - ] |
| Title: GF2A (TRANSFER / 4WD / AWD): DYNAMIC TORQUE VECTORING AWD SYSTEM: CALIBRATION; 2019 - 2025 MY RAV4 [11/2018 - ] | ||
CALIBRATION
NOTICE:
- When the 4WD ECU assembly is replaced, before removing the 4WD ECU assembly, it is necessary to perform ECU Data Save to save the original 4WD ECU assembly information.
- When the 4WD ECU assembly is replaced, it is necessary to perform the following in order: ECU Data Initialization and ECU Data Write.
- When the rear 4WD linear solenoid (electro magnetic control coupling sub-assembly) is replaced, it is necessary to perform the following in order: ECU Data Initialization and ECU Data Write (when replacing rear 4WD linear solenoid (electro magnetic control coupling sub-assembly)).
- When the front 4WD linear solenoid (transfer assembly) or rear 4WD linear solenoid (rear differential carrier assembly) is replaced, it is necessary to perform the following in order: ECU Data Initialization and Disconnect System Function Check.
-
When the yaw rate and acceleration sensor (airbag ECU assembly) is replaced, it is necessary to perform ECU Data Initialization.
Parts Replacement Compensation Table
Replaced Part
Necessary Procedure
4WD ECU assembly
Rear 4WD linear solenoid RH (electro magnetic control coupling sub-assembly RH)
- ECU Data Write (When replacing rear 4WD linear solenoid RH (electro magnetic control coupling sub-assembly RH))
Rear 4WD linear solenoid LH (electro magnetic control coupling sub-assembly LH)
- ECU Data Write (When replacing rear 4WD linear solenoid LH (electro magnetic control coupling sub-assembly LH))
Front 4WD linear solenoid (transfer assembly)
- ECU Data Initialization
- Disconnect System Function Check
Rear 4WD linear solenoid (rear differential carrier assembly)
- ECU Data Initialization
- Disconnect System Function Check
Yaw rate and acceleration sensor (airbag ECU assembly)
- ECU Data Initialization
Tire
- ECU Data Initialization (When performing tire replacement after RoB code X2104 is output)
ECU DATA SAVE
(a) Turn the ignition switch off.
(b) Connect the Techstream to the DLC3.
(c) Turn the ignition switch to ON.
(d) Turn the Techstream on.
(e) Enter the following menus: Chassis / Four Wheel Drive / Utility / ECU Data Save
HINT:
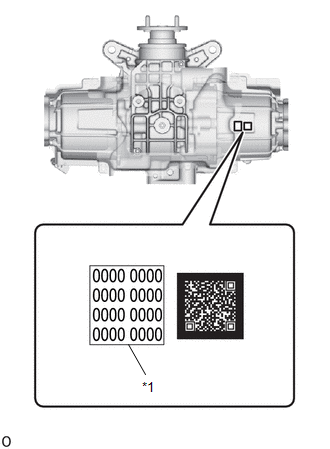
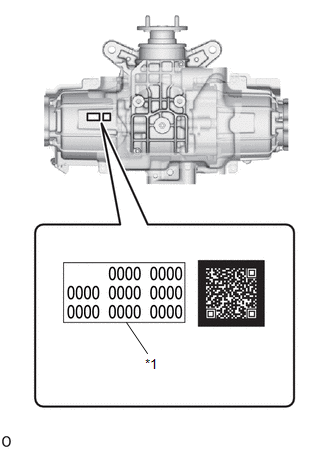
If the compensation code cannot be read, record the compensation code (4 digits in 8 blocks) on the electro magnetic control coupling sub-assembly compensation code label.

|
*1 |
Rear 4WD linear solenoid LH (electro magnetic control coupling sub-assembly LH) compensation code label |

|
*1 |
Rear 4WD linear solenoid RH (electro magnetic control coupling sub-assembly RH) compensation code label |
Chassis > Four Wheel Drive > Utility
|
Tester Display |
|---|
|
ECU Data Save |
(f) According to the display on the Techstream, complete work.
ECU DATA INITIALIZATION
(a) Turn the ignition switch off.
(b) Connect the Techstream to the DLC3.
(c) Turn the ignition switch to ON.
(d) Turn the Techstream on.
(e) Enter the following menus: Chassis / Four Wheel Drive / Utility / ECU Data Initialization.
Chassis > Four Wheel Drive > Utility
|
Tester Display |
|---|
|
ECU Data Initialization |
(f) According to the display on the Techstream, complete work.
ECU DATA WRITE (WHEN REPLACING REAR 4WD LINEAR SOLENOID (ELECTRO MAGNETIC CONTROL COUPLING SUB-ASSEMBLY))
(a) Record the printed compensation code (4 digits in 8 blocks) of a new rear 4WD linear solenoid (electro magnetic control coupling sub-assembly).

|
*1 |
Rear 4WD linear solenoid LH (electro magnetic control coupling sub-assembly LH) compensation code label |

|
*1 |
Rear 4WD linear solenoid RH (electro magnetic control coupling sub-assembly RH) compensation code label |
(b) Turn the ignition switch off.
(c) Connect the Techstream to the DLC3.
(d) Turn the ignition switch to ON.
(e) Turn the Techstream on.
(f) Enter the following menus: Chassis / Four Wheel Drive / Utility / ECU Data Write.
Chassis > Four Wheel Drive > Utility
|
Tester Display |
|---|
|
ECU Data Write |
(g) Using the on-screen buttons, input the compensation code.
(h) According to the display on the Techstream, complete work.
ECU DATA WRITE (WHEN REPLACING 4WD ECU ASSEMBLY)
(a) Turn the ignition switch off.
(b) Connect the Techstream to the DLC3.
(c) Turn the ignition switch to ON.
(d) Turn the Techstream on.
(e) Enter the following menus: Chassis / Four Wheel Drive / Utility / ECU Data Write.
Chassis > Four Wheel Drive > Utility
|
Tester Display |
|---|
|
ECU Data Write |
(f) According to the display on the Techstream, complete work.
DISCONNECT SYSTEM FUNCTION CHECK
HINT:
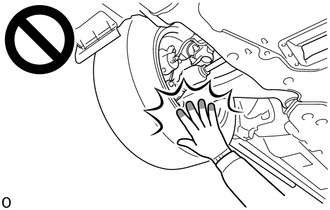
Perform this work with 4 or more people as the tires need to be rotated by hand when working.
(a) Turn the ignition switch off.
(b) Connect the Techstream to the DLC3.
(c) Turn the ignition switch to ON.
(d) Turn the Techstream on.
(e) Enter the following menus: Chassis / Four Wheel Drive / Utility / Disconnect System Function Check
Chassis > Four Wheel Drive > Utility
|
Tester Display |
|---|
|
Disconnect System Function Check |
(f) According to the display on the Techstream, complete work.
CAUTION:
Do not hold the inside of the wheel when rotating the tire, as doing so could pinch your fingers.
NOTICE:
If disconnect switching fails, perform the same procedure. If it fails again, inspect the part.
When replacing the front electro magnetic control clutch sub-assembly (transfer assembly):
When replacing the rear electro magnetic control clutch sub-assembly (rear differential carrier assembly):

|
|
|
![2019 - 2022 MY RAV4 [11/2018 - 10/2022]; GF2A (TRANSFER / 4WD / AWD): TRANSFER ASSEMBLY: INSTALLATION](/t3Portal/stylegraphics/info.gif)