| 
                           Last Modified: 05-08-2025 | 
                        6.11:8.1.0  | 
                        
                           Doc ID: RM100000001FHAL | 
                      
                     
                        | 
                           Model Year Start: 2019 | 
                        
                           Model: RAV4 HV | 
                        
                           Prod Date Range: [11/2018 -                    
                                       ] | 
                      
                     
                        | 
                           Title: HYBRID / BATTERY CONTROL: BATTERY BLOWER: INSTALLATION; 2019 - 2025 MY RAV4 HV [11/2018 -        ] | 
                      
                   
                  INSTALLATION
                   
                  PROCEDURE
                   
                  1. INSTALL BATTERY COOLING BLOWER BRACKET 
                  (a) Install the battery cooling blower bracket to the battery cooling blower assembly with the 3 bolts. 
                  Torque:  
                  7.5 N·m {76 kgf·cm, 66 in·lbf} 
                  (b) Engage the clamp. 
                   
                  2. INSTALL BATTERY COOLING BLOWER ASSEMBLY 
                  (a) Install the battery cooling blower assembly to the HV battery with the 2 bolts. 
                  Torque:  
                  7.5 N·m {76 kgf·cm, 66 in·lbf} 
                  
                     NOTICE: 
                     
                        - 
Be sure not to touch the fan part of the battery cooling blower assembly.
 
                        - 
Do not lift the battery cooling blower assembly using the wire harness.


                  (b) Connect the battery cooling blower assembly connector. 
                   
                  3. INSTALL NO. 1 HYBRID BATTERY INTAKE DUCT 
                  (a) Install the No. 1 hybrid battery intake duct to the battery cooling blower assembly with the 2 clips. 
                  (b) Engage the 2 clamps. 
                   
                  4. INSTALL REAR SEAT CUSHION LEG SUB-ASSEMBLY 
                  (a) Attach the 2 guides and install the rear seat cushion leg sub-assembly in the direction indicated by the arrow shown in the illustration. 


                            | 
                           
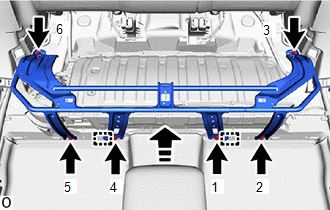
                               Install in this Direction 
                            | 


                  (b) Temporarily install the rear seat cushion leg sub-assembly with the 6 bolts. 
                  (c) Fully tighten the 6 bolts in the order shown in the illustration. 
                  Torque:  
                  19.5 N·m {199 kgf·cm, 14 ft·lbf} 
                   
                  5. INSTALL BATTERY SERVICE COVER BOARD 
                  (a) Engage the 2 guides to install the battery service cover board to the rear seat cushion leg sub-assembly. 
                  (b) Engage the 2 clips. 
                   
                  6. INSTALL NO. 2 BATTERY SERVICE COVER BOARD 
                  (a) Engage the 5 clips and guide. 
                  (b) Install the No. 2 battery service cover board with the 2 clips. 
                   
                  7. INSTALL REAR DOOR SCUFF PLATE RH 
                  HINT: 
                  Use the same procedure as for the LH side. 
                   
                  8. INSTALL NO. 3 BATTERY SERVICE COVER BOARD 
                  (a) Engage the 5 clips and guide. 
                  (b) Install the No. 3 battery service cover board with the 2 clips. 
                   
                  9. INSTALL REAR DOOR SCUFF PLATE LH 
                  Click here


                  10. INSTALL REAR SEAT CUSHION LOCK HOOK 
                  Click here


                  11. INSTALL BENCH TYPE REAR SEAT CUSHION ASSEMBLY 
                  Click here


                |