| Last Modified: 01-30-2024 | 6.11:8.1.0 | Doc ID: RM100000001FJ24 |
| Model Year Start: 2019 | Model: RAV4 | Prod Date Range: [11/2018 - ] |
| Title: WIPER / WASHER: WIPER AND WASHER SYSTEM: Wiper and Washer Switch Circuit; 2019 - 2024 MY RAV4 RAV4 HV [11/2018 - ] | ||
|
Wiper and Washer Switch Circuit |
DESCRIPTION
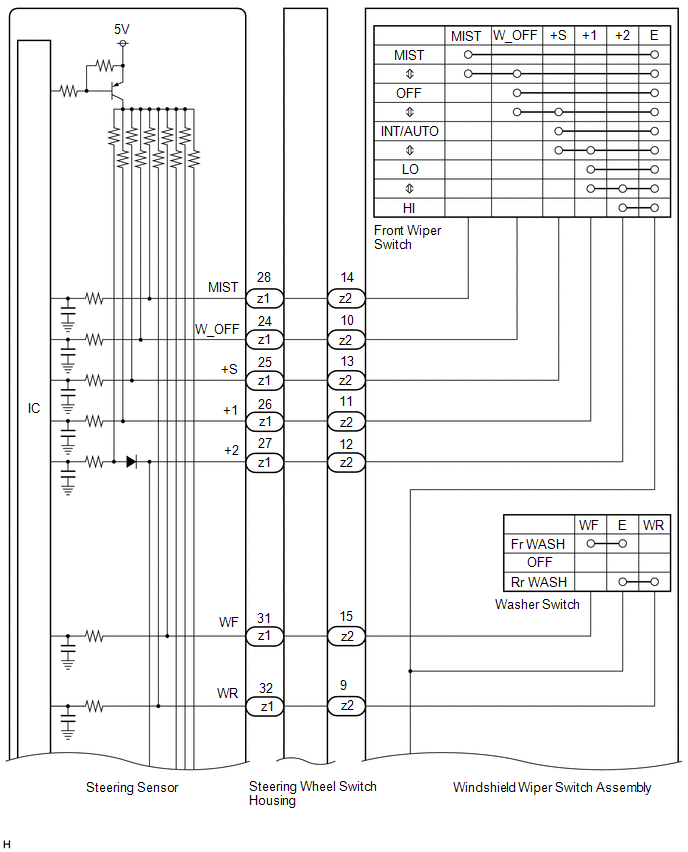
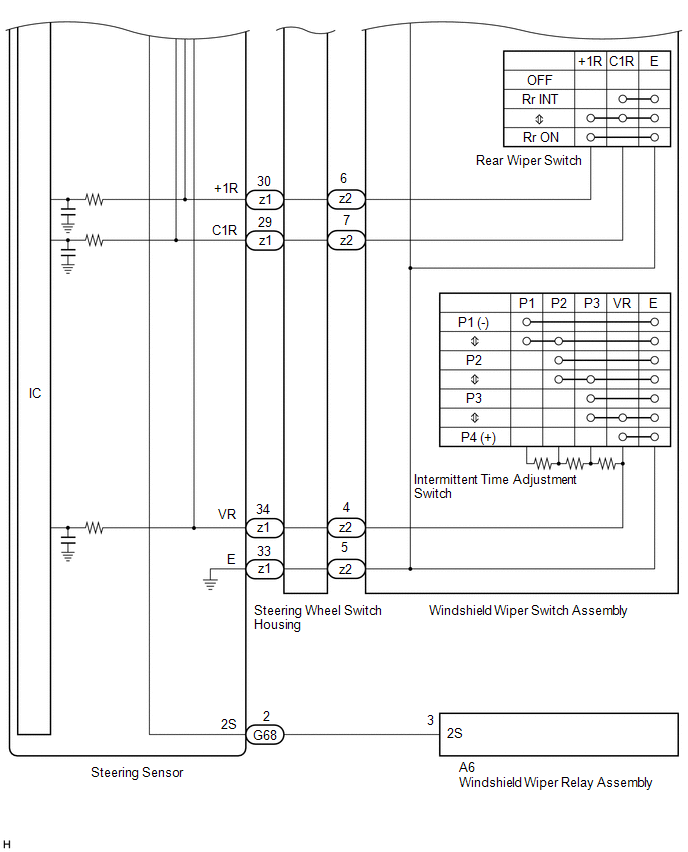
The condition of the windshield wiper switch assembly is detected and sent to the steering sensor in this circuit.
WIRING DIAGRAM


PROCEDURE
|
1. |
READ VALUE USING TECHSTREAM |
(a) Connect the Techstream to the DLC3.
(b) Turn the ignition switch to ON.
(c) Turn the Techstream on.
(d) Enter the following menus: Chassis / Steering Angle Sensor / Data List.
(e) Read the Data List according to the display on the Techstream.
Chassis > Steering Angle Sensor > Data List
|
Tester Display |
Measurement Item |
Range |
Normal Condition |
Diagnostic Note |
|---|---|---|---|---|
|
Wiper OFF Switch |
Windshield wiper switch assembly (OFF position) condition |
OFF or ON |
OFF: Windshield wiper switch assembly not in OFF position ON: Windshield wiper switch assembly in OFF position |
- |
|
Wiper Auto/Int Switch |
Windshield wiper switch assembly (AUTO position) condition |
OFF or ON |
OFF: Windshield wiper switch assembly not in AUTO position ON: Windshield wiper switch assembly in AUTO position |
w/ Auto Wiper System |
|
Wiper Lo Switch |
Windshield wiper switch assembly (LO position) condition |
OFF or ON |
OFF: Windshield wiper switch assembly not in LO position ON: Windshield wiper switch assembly in LO position |
- |
|
Wiper Hi Switch |
Windshield wiper switch assembly (HI position) condition |
OFF or ON |
OFF: Windshield wiper switch assembly not in HI position ON: Windshield wiper switch assembly in HI position |
- |
|
Wiper Mist Switch |
Windshield wiper switch assembly (MIST position) condition |
OFF or ON |
OFF: Windshield wiper switch assembly not in MIST position ON: Windshield wiper switch assembly in MIST position |
- |
|
Washer Switch |
Windshield wiper switch assembly (washer switch) condition |
OFF or ON |
OFF: Windshield wiper switch assembly (washer switch) in OFF position ON: Windshield wiper switch assembly (washer switch) in ON position |
- |
|
Rear Wiper Lo Switch |
Windshield wiper switch assembly (rear wiper switch LO position) condition |
OFF or ON |
OFF: Windshield wiper switch assembly (rear wiper switch) not in LO position ON: Windshield wiper switch assembly (rear wiper switch) in LO position |
- |
|
Rear Wiper Hi Switch |
Windshield wiper switch assembly (rear wiper switch HI position) condition |
OFF or ON |
OFF: Windshield wiper switch assembly (rear wiper switch) not in HI position ON: Windshield wiper switch assembly (rear wiper switch) in HI position |
- |
|
Rear Washer Switch |
Windshield wiper switch assembly (rear washer switch) condition |
OFF or ON |
OFF: Windshield wiper switch assembly (rear washer switch) in OFF position ON: Windshield wiper switch assembly (rear washer switch) in ON position |
- |
|
Intermittent Time Volume |
Intermittent time adjustment volume condition |
Shortest, Shorter, Longer or Longest |
Shortest: Windshield wiper switch assembly (intermittent time adjustment volume condition) P4 position Shorter: Windshield wiper switch assembly (intermittent time adjustment volume condition) P3 position Longer: Windshield wiper switch assembly (intermittent time adjustment volume condition) P2 position Longest: Windshield wiper switch assembly (intermittent time adjustment volume condition) P1 position |
- |
Chassis > Steering Angle Sensor > Data List
|
Tester Display |
|---|
|
Wiper OFF Switch |
|
Wiper Auto/Int Switch |
|
Wiper Lo Switch |
|
Wiper Hi Switch |
|
Wiper Mist Switch |
|
Washer Switch |
|
Rear Wiper Lo Switch |
|
Rear Wiper Hi Switch |
|
Rear Washer Switch |
|
Intermittent Time Volume |
OK:
The Techstream display changes correctly in response to the windshield wiper switch assembly operation.
| OK |

|
PROCEED TO NEXT SUSPECTED AREA SHOWN IN PROBLEM SYMPTOMS TABLE
|
|
|
2. |
INSPECT WINDSHIELD WIPER SWITCH ASSEMBLY |
(a) Remove the windshield wiper switch assembly.
(b) Inspect the windshield wiper switch assembly.
| NG |

|
|
|
3. |
INSPECT STEERING WHEEL SWITCH HOUSING |
(a) Remove the steering wheel switch housing.
(b) Inspect the steering wheel switch housing.
| NG |

|
|
|
4. |
CHECK HARNESS AND CONNECTOR (STEERING SENSOR - WINDSHIELD WIPER RELAY ASSEMBLY) |
(a) Disconnect the G68 steering sensor connector.
(b) Disconnect the A6 windshield wiper relay assembly connector.
(c) Measure the resistance according to the value(s) in the table below.
Standard Resistance:
|
Tester Connection |
Condition |
Specified Condition |
|---|---|---|
|
G68-2 (2S) - A6-3 (2S) |
Always |
Below 1 Ω |
|
G68-2 (2S) or A6-3 (2S) - Body ground |
Always |
10 kΩ or higher |
| OK |

|
| NG |

|
REPAIR OR REPLACE HARNESS OR CONNECTOR |
|
|
|
![2019 - 2020 MY RAV4 RAV4 HV [11/2018 - 08/2020]; WIPER / WASHER: WIPER AND WASHER SYSTEM: PROBLEM SYMPTOMS TABLE](/t3Portal/stylegraphics/info.gif)
