| 
                           Last Modified: 05-08-2025 | 
                        6.11:8.1.0  | 
                        
                           Doc ID: RM100000001H5TE | 
                      
                     
                        | 
                           Model Year Start: 2019 | 
                        
                           Model: RAV4 | 
                        
                           Prod Date Range: [02/2019 - 08/2020] | 
                      
                     
                        | 
                           Title: EXTERIOR PANELS / TRIM: FRONT BUMPER (for Off Road Package): INSTALLATION; 2019 - 2020 MY RAV4 RAV4 HV [02/2019 - 08/2020] | 
                      
                   
                  INSTALLATION
                   
                  CAUTION / NOTICE / HINT
                  
                     HINT: 
                     
                        - 
When the front bumper is damaged or deformed due to an accident or contact with other objects, etc., or the bumper installation area on the body is repaired, it is necessary to perform millimeter wave radar sensor adjustment.
Click here


                        - 
When the front bumper is damaged or deformed due to an accident or contact with other objects, etc., or the bumper installation area on the body is repaired, it is necessary to perform ultrasonic sensor detection angle measurement.
Click here


                        - 
A bolt without a torque specification is shown in the standard bolt chart.
Click here


                  PROCEDURE
                   
                  1. INSTALL FRONT BUMPER EXTENSION SUB-ASSEMBLY LH 
                  Click here


                  2. INSTALL FRONT BUMPER EXTENSION SUB-ASSEMBLY RH 
                  HINT: 
                  Use the same procedure as for the RH and LH side. 
                   
                  3. INSTALL FRONT BUMPER SEAL (for TMMC Made) 
                  HINT: 
                  When installing the front bumper seal, heat the front bumper lower absorber using a heat light. 
                  Standard:  


                           | 
                               Item 
                            | 
                           
                               Temperature 
                            | 


                           | 
                               Front Bumper Lower Absorber 
                            | 
                           
                               20 to 30°C (68 to 86°F) 
                            | 


                     CAUTION: 
                     
                        - 
Do not touch the heat light and heated parts.
 
                        - 
Touching the heat light may result in burns.
 
                        - 
Touching heated parts for a long time may result in burns.


                           | 
                               *a 
                            | 
                           
                               Heated Part 
                            | 
                         
                        
                           | 
                               *b 
                            | 
                           
                               Heat Light 
                            | 


                  NOTICE: 
                  Do not heat the front bumper lower absorber excessively. 
                  (a) When reusing the front bumper lower absorber: 
                  (1) Using a heat light, heat the front bumper lower absorber surface. 
                  (2) Remove any remaining double-sided tape from the front bumper lower absorber. 
                  (3) Wipe off any tape adhesive residue with cleaner. 
                  
                     NOTICE: 
                     
                        - 
Installing the front bumper seal with some double-sided tape remaining may cause poor adhesion. Perform this procedure until the tape is sufficiently removed.
 
                        - 
Make sure to use a cloth when removing. Using a screwdriver, etc., may cause damage and poor adhesion.
 
                        - 
Also, clean a new front bumper lower absorber surface.


                  (b) Remove the release paper of the new front bumper seal trying not to touch the adhesional surface. 
                  HINT: 
                  After removing the release paper, keep the exposed adhesive free from foreign matter. 
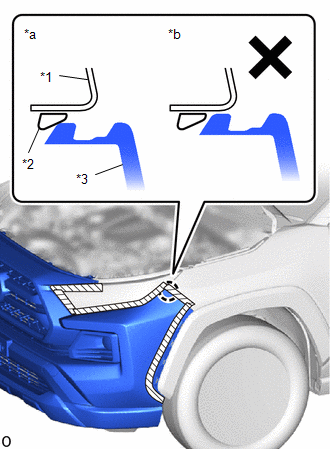
                  (c) Align 2 new front bumper seals with the mark-off line and rib on the front bumper lower absorber and install it. 
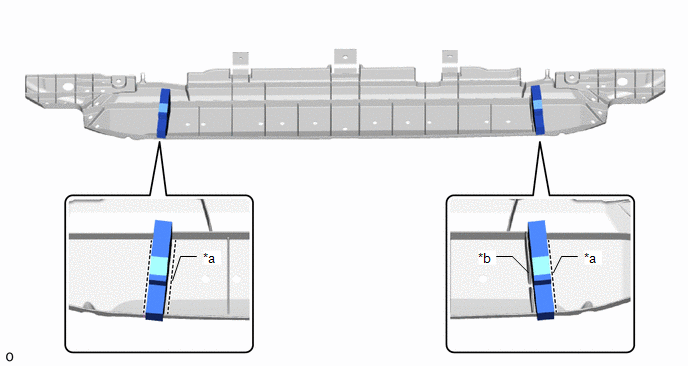


                  4. INSTALL FRONT BUMPER LOWER ABSORBER 
                  Click here


                  5. INSTALL NO. 1 ENGINE UNDER COVER 
                  Click here


                  6. INSTALL FRONT BUMPER REINFORCEMENT SUB-ASSEMBLY 
                  Click here


                  7. INSTALL FRONT BUMPER SIDE RETAINER LH 
                  Click here


                  8. INSTALL FRONT BUMPER SIDE RETAINER RH 
                  HINT: 
                  Use the same procedure described for the LH side. 
                   
                  9. INSTALL FRONT BUMPER NO. 2 ENERGY ABSORBER 
                  (a) Attach the guide and install the front bumper No. 2 energy absorber. 


                            | 
                           
                               Install in this Direction 
                            | 


                  10. INSTALL FRONT BUMPER ASSEMBLY 


                           | 
                               (a) Install new 2 clips to the front fender moulding sub-assembly LH. 
                              NOTICE: 
                              If the front bumper assembly has been removed, replace the clip with a new one. 
                              HINT: 
                              Use the same procedure as for the RH and LH side. 
                            | 
                           
                              
                            | 


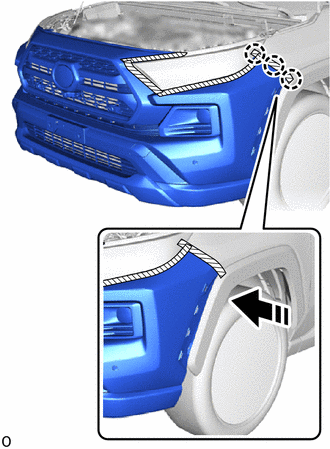
                  (b) Attach the claw to temporarily install the front bumper assembly. 


                            | 
                           
                               Install in this Direction 
                            | 


                           | 
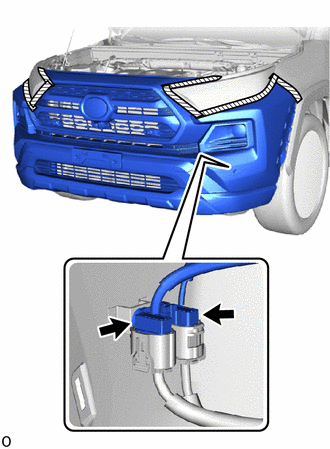
                               (c) Connect the 2 connectors. 
                            | 
                           
                              
                            | 


                  (d) Install the front bumper assembly to the front bumper side retainer LH. 


                           | 
                               (1) Make sure that the front bumper assembly claw contacts the front bumper side retainer LH as shown in the illustration. 
                            | 


                                     | 


                                                | 
                                                    *a 
                                                 | 
                                                
                                                    Correct 
                                                 | 
                                              
                                             
                                                | 
                                                    *b 
                                                 | 
                                                
                                                    Incorrect 
                                                 | 
                                              
                                             
                                                | 
                                                    *1 
                                                 | 
                                                
                                                    Front Fender Panel 
                                                 | 
                                              
                                             
                                                | 
                                                    *2 
                                                 | 
                                                
                                                    Front Bumper Side Retainer LH 
                                                 | 
                                              
                                             
                                                | 
                                                    *3 
                                                 | 
                                                
                                                    Front Bumper Assembly 
                                                 | 


                                     | 
                                  
                               
                            | 


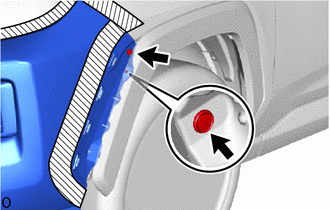
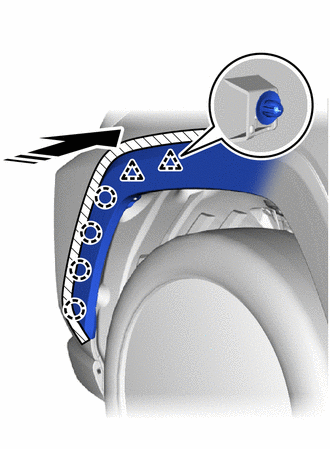
                  (2) Attach the claw to install the front bumper assembly as shown in the illustration. 


                            | 
                           
                               Install in this Direction 
                            | 


                  HINT: 
                  Use the same procedure as for the RH and LH side. 
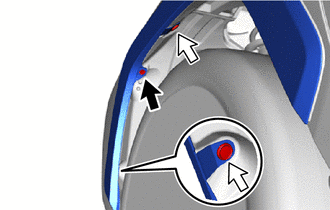
                  (3) After installation, if there is a clearance and the front bumper assembly claw can be seen as shown in the illustration, the installation condition is incorrect. Perform the procedure from step 1 again. 
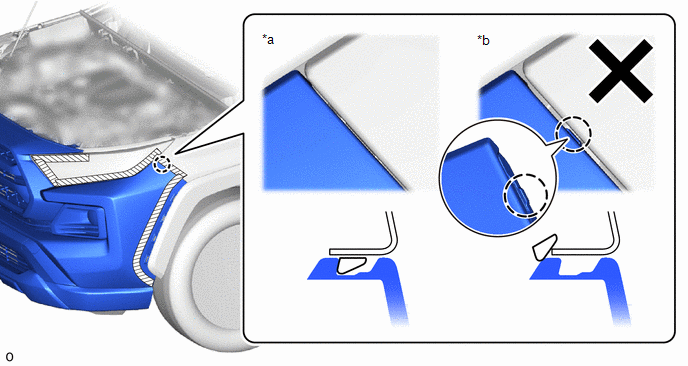


                           | 
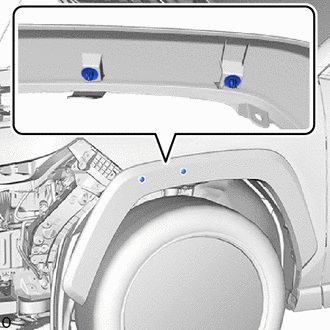
                               (e) Install the 2 clips. 
                              HINT: 
                              Use the same procedure as for the RH and LH side. 
                            | 
                           
                              
                            | 


                           | 
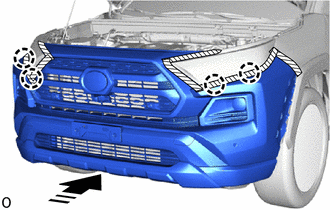
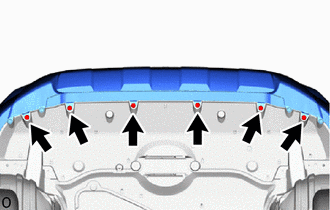
                               (f) Install the 6 screws. 
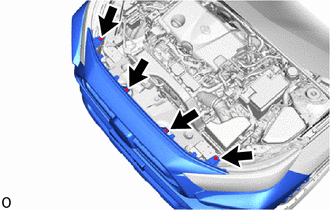
                            | 
                           
                              
                            | 


                  (h) Remove the protective tape. 
                   
                  11. INSTALL FRONT FENDER MOULDING SUB-ASSEMBLY LH 
                  (a) Attach the clip and claw to install the front fender moulding sub-assembly LH. 


                            | 
                           
                               Install in this Direction 
                            | 


                  (b) Remove the protective tape. 
                  (c) Install the screw. 


                            | 
                           
                               Clip 
                            | 


                            | 
                           
                               Screw 
                            | 


                  (d) Install the 2 clips. 
                   
                  12. INSTALL FRONT FENDER MOULDING SUB-ASSEMBLY RH 
                  HINT: 
                  Use the same procedure as for the LH side. 
                   
                  13. INSTALL FRONT FENDER FRONT SPLASH SHIELD LH 
                  HINT: 
                  Use the same procedure described for the RH side. 
                  (a) for Short Type: 
                  Click here


                  (b) for Long Type: 
                  Click here


                  14. INSTALL FRONT FENDER FRONT SPLASH SHIELD RH 
                  HINT: 
                  Use the same procedure as for the LH side. 
                   
                  15. ADJUST FOG LIGHT ASSEMBLY 
                  (a) for LED Type: 
                  Click here


                  (b) for Bulb Type: 
                  Click here


                  16. ADJUST FRONT TELEVISION CAMERA ASSEMBLY (w/ Panoramic View Monitor System) 
                  Click here


                |