- Ultrasonic sensor detection angle
- Ultrasonic sensor detection angle registration
| Last Modified: 01-30-2024 | 6.11:8.1.0 | Doc ID: RM100000001H5U9 |
| Model Year Start: 2019 | Model: RAV4 | Prod Date Range: [02/2019 - 10/2019] |
| Title: PARK ASSIST / MONITORING: ULTRASONIC SENSOR (for Rear): REMOVAL; 2019 MY RAV4 RAV4 HV [02/2019 - 10/2019] | ||
REMOVAL
CAUTION / NOTICE / HINT
The necessary procedures (adjustment, calibration, initialization or registration) that must be performed after parts are removed and installed, or replaced during ultrasonic sensor (for Rear) removal/installation are shown below.
Necessary Procedures After Parts Removed/Installed/Replaced (for HV Model)
|
Replaced Part or Performed Procedures |
Necessary Procedures |
Effect/Inoperative Function when Necessary Procedures are not Performed |
Link |
|---|---|---|---|
| *: When performing learning using the Techstream. | |||
|
Disconnect cable from negative (-) auxiliary battery terminal |
Perform steering sensor zero point calibration |
Lane control system |
|
|
Parking support brake system (for HV model)* |
|||
|
Pre-collision system |
|||
|
Lighting system (EXT)(w/ AFS) |
|||
|
Memorize steering angle neutral point |
Parking assist monitor system |
||
|
Panoramic view monitor system (for HV model) |
|||
|
Reset back door close position |
Power back door system (for HV model) |
||
|
Back door lock initialization |
Power door lock control system |
||
|
Ultrasonic sensor |
|
|
|
|
Kick door control sensor |
Reset connection history |
There are cases where the connection history display differs from the vehicle condition |
|
NOTICE:
After the ignition switch is turned off, the radio and display receiver assembly records various types of memory and settings. As a result, after turning the ignition switch off, be sure to wait for the time specified in the following table before disconnecting the cable from the negative (-) auxiliary battery terminal.
Waiting Time before Disconnecting Cable from Negative (-) Auxiliary Battery Terminal
|
System Name |
See Procedure |
|---|---|
|
Vehicle enrolled in Toyota Entune system or safety connect system |
6 minutes |
|
Vehicle not enrolled in Toyota Entune system and safety connect system |
1 minute |
Necessary Procedures After Parts Removed/Installed/Replaced (for Gasoline Model)
|
Replaced Part or Performed Procedures |
Necessary Procedures |
Effect/Inoperative Function when Necessary Procedures are not Performed |
Link |
|---|---|---|---|
| *: When performing learning using the Techstream. | |||
|
Disconnect cable from negative (-) auxiliary battery terminal |
Drive the vehicle until stop and start control is permitted (approximately 5 to 60 minutes) |
Stop and start system |
|
|
Perform steering sensor zero point calibration |
Lane control system |
||
|
Parking support brake system (for Gasoline model)* |
|||
|
Pre-collision System |
|||
|
Memorize steering angle neutral point |
Parking assist monitor system |
||
|
Panoramic view monitor system (for Gasoline model) |
|||
|
Reset back door close position |
Power back door system (for Gasoline model) |
||
|
Back door lock initialization |
Power door lock control system |
||
|
Ultrasonic sensor |
|
|
|
|
Kick door control sensor |
Reset connection history |
There are cases where the connection history display differs from the vehicle condition |
|
NOTICE:
After the ignition switch is turned off, the radio and display receiver assembly records various types of memory and settings. As a result, after turning the ignition switch off, be sure to wait for the time specified in the following table before disconnecting the cable from the negative (-) auxiliary battery terminal.
Waiting Time before Disconnecting Cable from Negative (-) Auxiliary Battery Terminal
|
System Name |
See Procedure |
|---|---|
|
Vehicle enrolled in Toyota Entune system or safety connect system |
6 minutes |
|
Vehicle not enrolled in Toyota Entune system and safety connect system |
1 minute |
PROCEDURE
1. PRECAUTION (w/ Hands Free Power Back Door)
NOTICE:
After turning the ignition switch off, waiting time may be required before disconnecting the cable from the negative (-) auxiliary battery terminal. Therefore, make sure to read the disconnecting the cable from the negative (-) auxiliary battery terminal notices before proceeding with work.
2. REMOVE DECK BOARD ASSEMBLY (for HV Model, w/ Hands Free Power Back Door)
3. REMOVE REAR NO. 2 FLOOR BOARD (for HV Model, w/ Hands Free Power Back Door)
4. REMOVE BATTERY HOLE COVER (for HV Model, w/ Hands Free Power Back Door)
5. DISCONNECT CABLE FROM NEGATIVE AUXILIARY BATTERY TERMINAL (w/ Hands Free Power Back Door)
(a) Disconnect the cable from the negative (-) auxiliary battery terminal.
NOTICE:
When disconnecting the cable, some systems need to be initialized after the cable is reconnected.
6. REMOVE REAR BUMPER ASSEMBLY
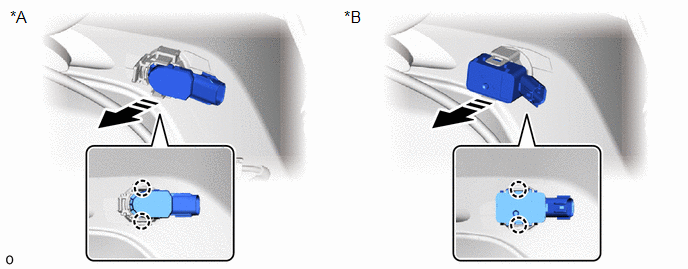
7. REMOVE REAR CORNER ULTRASONIC SENSOR
HINT:
- Use the same procedure for the RH and LH sides.
- The procedure listed below is for the LH side.
(a) Disconnect the connector.

|
*A |
w/o Parking Support Brake System |
*B |
w/ Parking Support Brake System |
(b) Detach the claw and remove the rear corner ultrasonic sensor.
NOTICE:
Before removing the sensor, make sure to mark the sensor and rear bumper assembly so that each sensor can be returned to its original position.

|
*A |
w/o Parking Support Brake System |
*B |
w/ Parking Support Brake System |

|
Remove in this Direction |
- |
- |
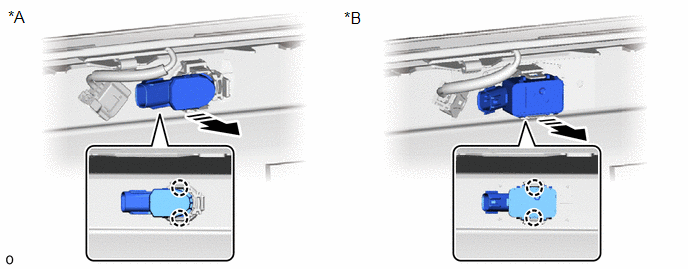
8. REMOVE REAR CENTER ULTRASONIC SENSOR
HINT:
- Use the same procedure for the RH and LH sides.
- The procedure listed below is for the LH side.
(a) Disconnect the connector.

|
*A |
w/o Parking Support Brake System |
*B |
w/ Parking Support Brake System |
(b) Detach the claw and remove the rear center ultrasonic sensor.
NOTICE:
Before removing the sensor, make sure to mark the sensor and rear bumper assembly so that each sensor can be returned to its original position.

|
*A |
w/o Parking Support Brake System |
*B |
w/ Parking Support Brake System |

|
Remove in this Direction |
- |
- |
9. REMOVE REAR CORNER ULTRASONIC SENSOR RETAINER
HINT:
- Perform the following procedure only when replacement of a rear corner ultrasonic sensor retainer is necessary.
- When removing the rear corner ultrasonic sensor retainer, if the double-sided tape is difficult to remove, heat the adhesive of the rear corner ultrasonic sensor retainer and rear bumper assembly using a heat light.
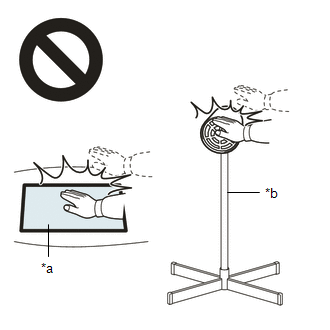
(a) Heat the rear bumper assembly and rear corner ultrasonic sensor retainer using a heat light.
CAUTION:
- Do not touch the heat light and heated parts.
- Touching the heat light may result in burns.
- Touching heated parts for a long time may result in burns.

|
*a |
Heated Part |
|
*b |
Heat Light |
Standard:
|
Item |
Temperature |
|---|---|
|
Rear Bumper Assembly |
40 to 60°C (104 to 140°F) |
|
Rear Corner Ultrasonic Sensor Retainer |
(b) Remove the rear corner ultrasonic sensor retainer.
(1) for LH Side:

|
*A |
w/o Parking Support Brake System |
*B |
w/ Parking Support Brake System |
(2) for RH Side:

|
*A |
w/o Parking Support Brake System |
*B |
w/ Parking Support Brake System |
10. REMOVE REAR CENTER ULTRASONIC SENSOR RETAINER
HINT:
- Perform the following procedure only when replacement of a rear center ultrasonic sensor retainer is necessary.
- When removing the rear center ultrasonic sensor retainer, if the double-sided tape is difficult to remove, heat the adhesive of the rear center ultrasonic sensor retainer and rear bumper assembly using a heat light.
- Use the same procedure for the RH and LH sides.
- The procedure listed below is for the LH side.
(a) Heat the rear bumper assembly and rear center ultrasonic sensor retainer using a heat light.
CAUTION:
- Do not touch the heat light and heated parts.
- Touching the heat light may result in burns.
- Touching heated parts for a long time may result in burns.

|
*a |
Heated Part |
|
*b |
Heat Light |
Standard:
|
Item |
Temperature |
|---|---|
|
Rear Bumper Assembly |
40 to 60°C (104 to 140°F) |
|
Rear Center Ultrasonic Sensor Retainer |
(b) Remove the rear center ultrasonic sensor retainer.

|
*A |
w/o Parking Support Brake System |
*B |
w/ Parking Support Brake System |
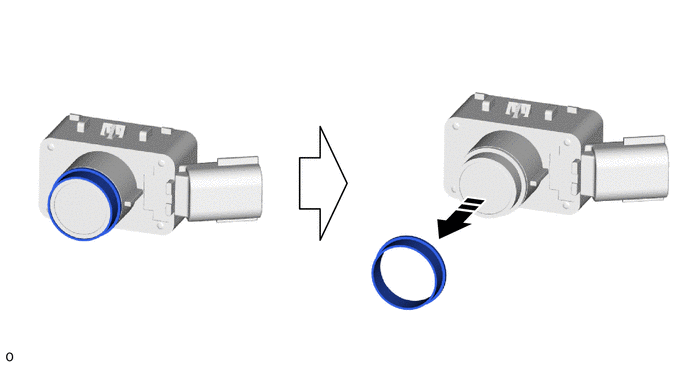
11. REMOVE ULTRASONIC SENSOR CUSHION SET (w/ Parking Support Brake System)
HINT:
Only perform this procedure when removing and installing the ultrasonic sensor cushion set.
(a) Remove the ultrasonic sensor cushion set as shown in the illustration.


|
Remove in this Direction |
- |
- |
|
|
|
![2019 - 2022 MY RAV4 HV [02/2019 - 10/2022]; PARK ASSIST / MONITORING: PARKING SUPPORT BRAKE SYSTEM (for HV Model): CALIBRATION](/t3Portal/stylegraphics/info.gif)