| 
                           Last Modified: 05-08-2025 | 
                        6.11:8.1.0  | 
                        
                           Doc ID: RM1000000021U3Y | 
                      
                     
                        | 
                           Model Year Start: 2022 | 
                        
                           Model: RAV4 HV | 
                        
                           Prod Date Range: [12/2021 -                    
                                       ] | 
                      
                     
                        | 
                           Title: A25A-FXS (COOLING): THERMOSTAT: INSTALLATION; 2022 - 2025 MY RAV4 HV [12/2021 -        ] | 
                      
                   
                  INSTALLATION
                   
                  CAUTION / NOTICE / HINT
                  NOTICE: 
                  This procedure includes the removal of small-head bolts. Refer to Small-Head Bolts of Basic Repair Hint to identify the small-head bolts. 
                  Click here


                  PROCEDURE
                   
                  1. INSTALL WATER INLET WITH THERMOSTAT SUB-ASSEMBLY 
                  (a) Install a new gasket to the water inlet with thermostat sub-assembly. 
                  HINT: 
                  Be sure to clean the contact surfaces. 
                  (b) Using an 8 mm socket wrench, install the water inlet with thermostat sub-assembly with the 2 bolts. 
                  Torque:  
                  10 N·m {102 kgf·cm, 7 ft·lbf} 
                  (c) Connect the No. 7 water by-pass hose to the water inlet with thermostat sub-assembly and slide the clip to secure it. 
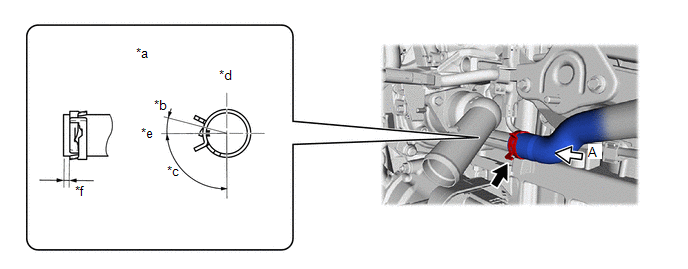


                           | 
                               *a 
                            | 
                           
                               View A 
                            | 
                           
                               *b 
                            | 
                           
                               15° 
                            | 
                         
                        
                           | 
                               *c 
                            | 
                           
                               90° 
                            | 
                           
                               *d 
                            | 
                           
                               Upper Side 
                            | 
                         
                        
                           | 
                               *e 
                            | 
                           
                               LH Side 
                            | 
                           
                               *f 
                            | 
                           
                               1 mm (0.0394 in.) or higher 
                            | 


                  NOTICE: 
                  Make sure that the tabs of the clip are within the area shown in the illustration. 
                   
                  2. CONNECT NO. 2 RADIATOR HOSE 
                  Click here


                  3. INSTALL INTAKE MANIFOLD 
                  Click here


                  4. ADD ENGINE COOLANT (for Engine) 
                  Click here


                  5. INSPECT FOR COOLANT LEAK (for Engine) 
                  Click here


                |