| Last Modified: 01-30-2024 | 6.11:8.1.0 | Doc ID: RM1000000022072 |
| Model Year Start: 2022 | Model: RAV4 | Prod Date Range: [12/2021 - ] |
| Title: REAR SUSPENSION: REAR LOWER ARM: INSTALLATION; 2022 - 2024 MY RAV4 RAV4 HV [12/2021 - ] | ||
INSTALLATION
CAUTION / NOTICE / HINT
HINT:
- Use the same procedure for the RH side and LH side.
- The following procedure is for the LH side.
PROCEDURE
1. TEMPORARILY INSTALL REAR NO. 1 SUSPENSION ARM ASSEMBLY
(a) Temporarily install the rear No. 1 suspension arm assembly to the rear axle carrier sub-assembly and rear suspension member sub-assembly with the 2 bolts and 2 nuts.
NOTICE:
- Because the nut has its own stopper, do not turn the nut. Tighten the bolt with the nut secured.
- Insert the bolt with the threaded end facing the rear of the vehicle.
2. TEMPORARILY INSTALL REAR NO. 2 SUSPENSION ARM ASSEMBLY
(a) Temporarily install the rear No. 2 suspension arm assembly to the rear suspension member sub-assembly with the No. 2 camber adjust cam, rear suspension toe adjust cam sub-assembly and nut.
NOTICE:
- Insert the rear suspension toe adjust cam sub-assembly from the front of the vehicle.
- When tightening the nut, keep the rear suspension toe adjust cam sub-assembly from rotating.
3. INSTALL REAR LOWER COIL SPRING INSULATOR
4. INSTALL REAR COIL SPRING
5. STABILIZE SUSPENSION
6. INSTALL REAR STABILIZER LINK ASSEMBLY
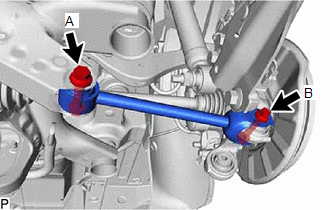
7. INSTALL REAR NO. 1 SUSPENSION ARM ASSEMBLY
|
(a) Install the rear No. 1 suspension arm assembly with the 2 bolts. Torque: Bolt A : 115 N·m {1173 kgf·cm, 85 ft·lbf} Bolt B : 73 N·m {744 kgf·cm, 54 ft·lbf} NOTICE: Because the nut has its own stopper, do not turn the nut. Tighten the bolt with the nut secured. |
|
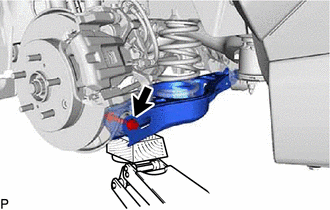
8. INSTALL REAR NO. 2 SUSPENSION ARM ASSEMBLY
|
(a) Install the rear No. 2 suspension arm assembly (rear axle carrier sub-assembly side) with the bolt. Torque: 73 N·m {744 kgf·cm, 54 ft·lbf} NOTICE: Because the nut has its own stopper, do not turn the nut. Tighten the bolt with the nut secured. |
|
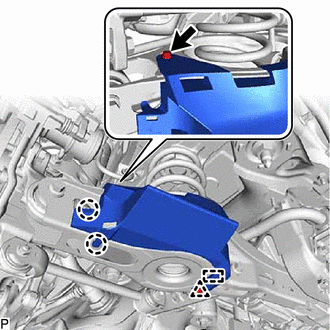
9. INSTALL LOWER NO. 2 CONTROL ARM COVER (w/ Cover)
|
(a) Engage the 2 claws and guide to install the lower No. 2 control arm cover to the rear No. 2 suspension arm assembly. |
|
(b) Install the clip.
(c) Install the bolt.
Torque:
12 N·m {122 kgf·cm, 9 ft·lbf}
10. INSTALL REAR WHEEL
11. INSTALL REAR NO. 2 SUSPENSION ARM ASSEMBLY
(a) Lower the vehicle to the ground.
(b) Bounce the vehicle up and down at the corners to stabilize the rear suspension.
|
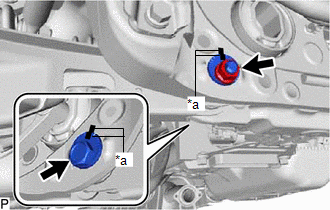
(c) Align the matchmarks on the No. 2 camber adjust cam, rear suspension toe adjust cam sub-assembly and rear suspension member sub-assembly. |
|
(d) Fully tighten the nut.
Torque:
100 N·m {1020 kgf·cm, 74 ft·lbf}
NOTICE:
- Hold the rear suspension toe adjust cam sub-assembly while rotating the nut.
- Make sure that the vehicle is unloaded when fully tightening the nut.
12. INSPECT AND ADJUST REAR WHEEL ALIGNMENT
13. PERFORM INITIALIZATION
|
|
|
![2022 - 2024 MY RAV4 RAV4 HV [12/2021 - ]; REAR SUSPENSION: REAR COIL SPRING: INSTALLATION+](/t3Portal/stylegraphics/info.gif)


