| 
                           Last Modified: 05-08-2025 | 
                        6.11:8.1.0  | 
                        
                           Doc ID: RM10000000258B3 | 
                      
                     
                        | 
                           Model Year Start: 2023 | 
                        
                           Model: RAV4 | 
                        
                           Prod Date Range: [10/2022 - 10/2023] | 
                      
                     
                        | 
                           Title: AUDIO / VIDEO: STEREO COMPONENT AMPLIFIER: REMOVAL; 2023 MY RAV4 RAV4 HV [10/2022 - 10/2023] | 
                      
                   
                  REMOVAL
                   
                  PROCEDURE
                   
                  1. REMOVE BENCH TYPE REAR SEAT CUSHION ASSEMBLY 
                  Click here


                  2. REMOVE REAR SEAT CUSHION LOCK HOOK 
                  Click here


                  3. REMOVE REAR CENTER SEAT OUTER BELT ASSEMBLY (FLOOR ANCHOR) 
                  Click here


                  4. REMOVE REAR SEATBACK ASSEMBLY RH 
                  Click here


                  5. REMOVE REAR DOOR SCUFF PLATE RH 
                  HINT: 
                  Use the same procedure described for the LH side. 
                  Click here


                  6. REMOVE NO. 2 BATTERY SERVICE COVER BOARD (for HV Model) 
                  Click here


                  7. REMOVE REAR SEATBACK HINGE SUB-ASSEMBLY RH 
                  HINT: 
                  Use the same procedure described for the LH side. 
                  Click here


                  8. REMOVE CHILD RESTRAINT SEAT ANCHOR BRACKET SUB-ASSEMBLY RH 
                  HINT: 
                  Use the same procedure described for the LH side. 
                  Click here


                  9. REMOVE REAR DOOR OPENING TRIM WEATHERSTRIP RH 
                  
                     HINT: 
                     
                        - 
Pull back the rear door opening trim weatherstrip RH so that the rear seat side garnish RH can be removed.
 
                        - 
Use the same procedure described for the LH side.
Click here


                  10. REMOVE REAR SEAT SIDE GARNISH RH 
                  HINT: 
                  Use the same procedure described for the LH side. 
                  Click here


                  11. REMOVE TONNEAU COVER ASSEMBLY (w/ Tonneau Cover) 
                  Click here


                  12. REMOVE DECK BOARD ASSEMBLY 
                  Click here


                  13. REMOVE REAR NO. 2 FLOOR BOARD 
                  Click here


                  14. REMOVE REAR FLOOR FINISH PLATE 
                  Click here


                  15. REMOVE REAR NO. 1 FLOOR MAT SUPPORT SIDE PLATE 
                  Click here


                  16. REMOVE LUGGAGE HOLD BELT STRIKER ASSEMBLY 
                  Click here


                  17. REMOVE TETHER ANCHOR BRACKET SET 
                  Click here


                  18. REMOVE DECK TRIM SIDE PANEL ASSEMBLY RH 
                  Click here


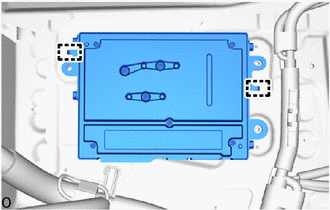
                  19. REMOVE STEREO COMPONENT AMPLIFIER ASSEMBLY WITH BRACKET 
                  (a) Disconnect the 2 connectors. 
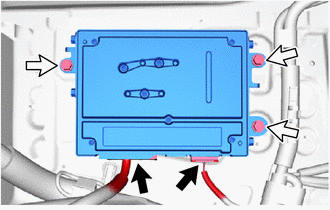


                            | 
                           
                               Connector 
                            | 


                            | 
                           
                               Bolt 
                            | 


                  (b) Remove the 3 bolts. 


                           | 
                               (c) Detach the guide and remove the stereo component amplifier assembly with bracket. 
                            | 
                           
                              
                            | 


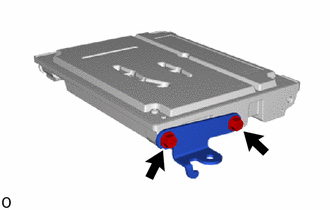
                  20. REMOVE NO. 1 AMPLIFIER BRACKET 


                           | 
                               (a) Remove the 2 screws and No. 1 amplifier bracket. 
                            | 
                           
                              
                            | 


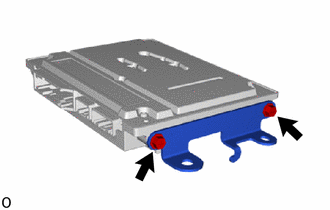
                  21. REMOVE NO. 2 AMPLIFIER BRACKET 


                           | 
                               (a) Remove the 2 screws and No. 2 amplifier bracket. 
                            | 
                           
                              
                            | 


                  22. REMOVE STEREO COMPONENT AMPLIFIER ASSEMBLY 
                  
                |