- Power back door unit assembly LH
- Power back door unit assembly RH
| Last Modified: 01-30-2024 | 6.11:8.1.0 | Doc ID: RM100000002EKCE |
| Model Year Start: 2024 | Model: RAV4 | Prod Date Range: [10/2023 - ] |
| Title: DOOR / HATCH: POWER BACK DOOR DRIVE UNIT: REMOVAL; 2024 MY RAV4 RAV4 HV [10/2023 - ] | ||
REMOVAL
CAUTION / NOTICE / HINT
The necessary procedures (adjustment, calibration, initialization, or registration) that must be performed after parts are removed, installed, or replaced during the power back door unit assembly removal/installation are shown below.
Necessary Procedure After Parts Removed/Installed/Replaced (for HV Model)
|
Replaced Part or Performed Procedure |
Necessary Procedure |
Effect/Inoperative Function when Necessary Procedure not Performed |
Link |
|---|---|---|---|
|
|
Reset connection history |
There are cases where the connection history display differs from the vehicle condition |
|
|
Reset back door close position |
Power back door system |
Necessary Procedure After Parts Removed/Installed/Replaced (for Gasoline Model)
|
Replaced Part or Performed Procedure |
Necessary Procedure |
Effect/Inoperative Function when Necessary Procedure not Performed |
Link |
|---|---|---|---|
|
Reset connection history |
There are cases where the connection history display differs from the vehicle condition |
|
|
Reset back door close position |
Power back door system |
HINT:
- Use the same procedure for the RH and LH sides.
- The procedure below is for the LH side.
PROCEDURE
1. REMOVE BACK DOOR CENTER GARNISH
2. REMOVE BACK DOOR SIDE GARNISH LH
3. REMOVE BACK DOOR SIDE GARNISH RH
HINT:
Use the same procedure described for the LH side.
4. REMOVE BACK DOOR GRIP BASE
5. REMOVE BACK DOOR GRIP
HINT:
Use the same procedure described for the back door grip base.
6. REMOVE BACK DOOR TRIM BOARD ASSEMBLY
7. REMOVE POWER BACK DOOR UNIT ASSEMBLY LH
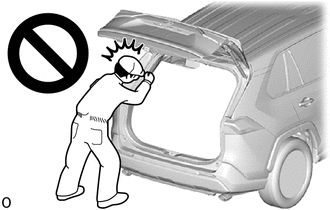
CAUTION:
- Do not perform work if the back door is not securely supported.
- The back door could fall, resulting in injury.
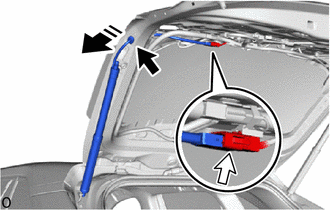
(a) Disconnect the connector.

|
Grommet |

|
Connector |

|
Remove in this Direction |
(b) Disconnect the grommet and pull out the power back door unit assembly LH harness as shown in the illustration.
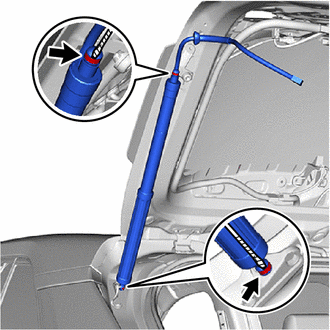
(c) Using a screwdriver with its tip wrapped with protective tape, slightly raise the 2 stop rings as shown in the illustration.

|
Protective Tape |
(d) Detach the 2 ball joints to remove the power back door unit assembly LH.
NOTICE:
- Remove the power back door unit assembly LH while supporting the back door by hand.
- Remove the back door stay assembly while supporting the back door stay assembly by hand.
8. REMOVE BACK DOOR UPPER DAMPER STAY BRACKET LH
|
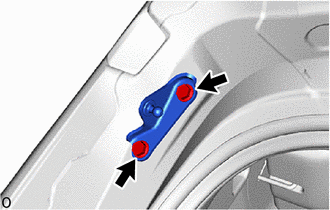
(a) Remove the 2 bolts and back door upper damper stay bracket LH. |
|
9. REMOVE BACK DOOR LOWER DAMPER STAY BRACKET LH
|
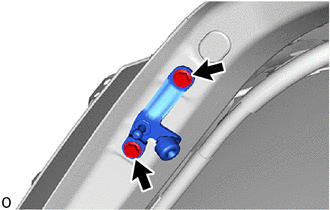
(a) Remove the 2 bolts and back door lower damper stay bracket LH with back door stay stopper. |
|
10. REMOVE BACK DOOR STAY STOPPER
|
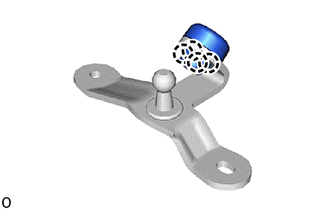
(a) Detach the claw and remove the back door stay stopper from the back door lower damper stay bracket LH. |
|
|
|
|
![2024 MY RAV4 RAV4 HV [10/2023 - ]; DOOR / HATCH: POWER BACK DOOR SYSTEM: DATA LIST / ACTIVE TEST](/t3Portal/stylegraphics/info.gif)
